| Welcome to the Bartels Group of Companies |
|
 |
|
|
|
With real jobs you should make sure that all of the required power layers are defined (use the function from the Layout Editor menu), the top signal layer setting is correct (use the function from the Layout Editor menu) and pre-routed critical traces such as power supply are fixed, before starting the autorouting process. After finishing the autorouting, you should always run a from the Layout Editor before generating manufacturing data with the CAM Processor. The user interface of the Bartels Autorouter is similar to the one of the Layout Editor. The Bartels Autorouter provides standard autorouting functions (full and initial routing, rip-up and retry routing, optimizer) and a series of enhanced placement and routing features such as automatic pre-placement with placement optimization, single net routing, net-group routing, component routing, area and/or block routing, mixed-grid routing, selective component and pin/gate swap during rip-up routing, etc. The Autorouter version provided with the BAE HighEnd system provides powerful autorouting technologies based on patented neural network technology. The BAE HighEnd Autorouter supports skilled analogue signal routing, automatic microwave structure generation, grid-less object-orientated routing with automatic placement optimization, etc. The BAE HighEnd Autorouter also provides features for routing problem recognition and/or classification and for learning and automatically applying problem-adapted routing strategies and/or rules. 4.5.1 Starting the AutorouterThe function from the Layout Editor menu is used to start the Autorouter. After activating this function, the system automatically saves the currently loaded layout and the Autorouter program module starts. The Autorouter automatically re-loads any previously loaded layout. The layout requires a board outline definition (to be defined with the function from the Layout Editor menu) and a valid via assignment list (use function from the Layout Editor menu). Before starting any autorouter procedure, all net list parts must be placed with correct package types inside the board outline (no part or pin neither any pre-routed trace or via can be placed outside the board outline). The following error messages might be issued when activating an Autorouter procedure:
Other error messages might be issued if the layout contains short circuits caused by pre-routed fixed traces. 4.5.2 Autorouter Main MenuThe Autorouter standard/sidmenu user interface provides a menu area on the right side, consisting of the main menu on top and the currently active menu below that main menu. After entering the Autorouter the menu cursor points to the function. The Windows and Motif versions of the
Autorouter can optionally be operated with a pull-down menu user interface providing a horizontally arranged main menu bar on top. The
The following main menu is always available whilst processing layouts with the Autorouter:
The functions provided with the menu allow to use the Autorouter without fear of causing damage. Up to twenty commands can be reversed or undone using and then reprocessed with . This is true even for complex processing such as complete autorouting passes or User Language program execution. ensures data security and provides a powerful feature for estimating design alternatives. The or menu can either be activated by selecting the corresponding main menu item or by pressing the middle mouse button. Activation through the middle mouse button is even possible whilst performing a graphical manipulation such as selecting a net or component for routing. The or menu provides useful functions for changing display options such as zoom window, zoom scale, input and/or display grids, grid and/or angle lock, color settings, etc. The menu of the Autorouter is equal to the menu of the Layout Editor (see chapters 4.4.3 and 4.4.4). The Autorouter provides the same initial placement and placement optimization functions as already known from the Layout Editor, allowing for initial placement and placement optimization to be applied in the Autorouter without having to go back to the Layout Editor. The menu provides the functions for activating autorouting procedures such as , , , and . The function is used to run a series of router passes previously defined with the function. The menu provides the functions for activating special routing operations such as single net routing, net group routing, component routing, area/block routing, etc. The menu is used to set fundamental Autorouter options for subsequent router passes. These parameters define the design rules and technology requirements to be considered by the Autorouter (signal layer count, layer assignment, routing grid with half-grid routing option, standard trace width, standard minimum distance, maximum via count, via grid, on-grid or off-grid trace bending, pin contact mode). The parameters defined from the menu are stored with the layout. Changes to basic routing option parameters (signal layer count, routing grid, toggle half-grid option, standard trace width, standard minimum distance, pin contact mode) cause an automatic router restart (with discard of current routing results) when re-entering some standard autorouting process such as , initial routing, SMD fan out routing, rip-up routing, optimizing and . The menu provides basic functions for controlling the routing process such as setting the optimizer passes count, activate/deactivate multi-net pattern recognition during rip-up and/or optimization, set the persistence of the rip-up router, activate automatic SMD fan out routing and turn on or turn off automatic security copy. The menu provides functions for setting the strategy parameters and heuristic cost factors to be used by subsequent router and optimizer passes (optimizer routing direction, via costs, pin channel costs, counter direction costs, direction change costs, packing costs, dynamic density cost factor, bus bending costs, rip-up distance costs, trace crossing costs, diagonal routing costs, off-grid routing costs). The menu provides functions for selecting the layout library, setting the coordinate display mode, selecting the function for the airline display and activating the automatic design data backup feature. The menu provides functions for exiting BAE, returning to the BAE main shell, calling the Layout Editor and starting User Language programs. This menu also provides important file management functions such as load and save layout elements or list DDB file contents. 4.5.3 Customized Autorouter User InterfaceThe BAE software comes with User Language programs for activating a modified Autorouter user interface with many additional functions (startups, toolbars, menu assignments, key bindings, etc.). The bae_st User Language program is automatically started when entering the Autorouter bae_st calls the uifsetup User Language program which activates predefined Autorouter menu assignments and key bindings. Menu assignments and key bindings can be changed by modifying and re-compiling the uifsetup source code. The hlpkeys User Language program is used to list the current key bindings. With the predefined menu assignments of uifsetup activated, hlpkeys can be called from the function of the menu. Menu assignments and key bindings can be listed with the uifdump User Language program. The uifreset User Language program can be used to reset all currently defined menu assignments and key bindings. uifsetup, uifdump and uifreset can also be called from the menu of the keyprog User Language program which provides additional facilities for online key programming and User Language program help info management. The Windows and Motif pull down menu user interfaces of the Autorouter provide facilities for cascading submenu definitions. I.e., submenus can be attached to other menu items. The uifsetup User Language program configures cascading submenus for the pulldown menu interfaces of the Windows/Motif Autorouter modules. This allows for easy submenu function location (and activation) without having to activate (and probably cancel) submenus. The function repeat facility provided through the right mouse button supports cascading menus to simplify repeated submenu function calls. The following Windows/Motif parameter setup dialogs are implemented for the Autorouter:
The uifsetup User Language program replaces the parameter setup functions of the Windows and Motif pulldown menus with the above menu functions for activating the corresponding parameter setup dialogs. When using pulldown menus under Windows and Motif, the uifsetup User Language program configures the following modified Autorouter main menu with a series of additional functions and features:
4.5.4 In-built Autorouter System FeaturesAutomatic Parameter BackupThe Autorouter provides an in-built feature for automatically saving important design and operational parameters with the currently processed SCM sheet and/or SCM library hierarchy level. The following parameters are stored to the current design file when activating the function:
Parameter sets are stored using the current layout element name. When loading a layout, the corresponding parameter set is automatically loaded and/or activated, thus providing a convenient way of activating a default parameter set suitable for processing the selected design. Graphical Output and Status DisplaysThe current routing result is displayed graphically and through statistical readouts whilst routing is in progress. Graphic output and statistical readout during routing can be deactivated by pressing key d. The message is displayed whilst router graphic output is deactivated. Pressing the 'd' key again reactivates the graphic output and the statistical readout. The routing process accelerates by up to 10 percent if graphic output is deactivated. A screen redraw is automatically performed after the routing process has finished. The number of currently routed connections (compared to the total connection count) and the global via count are continuously reported in the status line whilst during Autorouting processes. Additionally, a routing pass info window for displaying internal routing procedure information is provided on the right side of the
Autorouter user interface. This info window contains a status line for identifying the currently active router pass type
( The menu is used to set parameters for controlling graphical output. The zoom functions (, , ) are used to select the workspace to be displayed. Usually, one would use to display the complete Autorouter work area (i.e. the workspace designated by the board outline). is the default setting after starting the Autorouter. The functions for changing the zoom factor ( and ) and the function can only be executed if layout data is already loaded. The
function is used to change the current color setup. The
function is used to load a predefined color table. On default, the
Autorouter uses the color table named
The function is used to set the width at which circuit traces are displayed with their true widths. All traces having a screen width greater than the clipping width are displayed with their true widths. All traces having a screen width less than the clipping width are displayed as center lines. The default clipping width value is 1.5mm. The function is used to display connections to active copper areas using either cross-shaped markers on connected pins (option ) or airlines connecting pins and copper area gravity points (option ). On default the option is used. User LanguageThe Bartels User Language Interpreter is integrated to the Autorouter, i.e., User Language programs can be called from the Autorouter, and it is possible to implement any user-specific Autorouter function required such as status display, parameter setup, reports and test functions, CAD/CAM input/output functions, automatic or semi-automatic placement and/or routing functions, customer-specific batch procedures, etc. The
Autorouter provides both explicit and implicit
User Language program call facilities.
User Language programs can be started with explicit program name specification using the
function from the
menu (empty string or question-mark
( User Language programs can also be called by simply pressing special keys of the keyboard. This method of implicit User Language program call is supported at any time unless another interactive keyboard input request is currently pending. The name of the User Language program to be called is automatically derived from the pressed key, i.e. pressing a standard and/or function key triggers the activation of a User Language program with a corresponding name such as ar_1 for digit key 1, ar_r for standard key r, ar_# for standard key #, ar_f1 for function key F1, ar_f2 for function key F2, etc. The Autorouter environment also features event-driven User Language program calls, where User Language programs with predefined names are automatically started at certain events and/or operations such as ar_st at Autorouter module startup, ar_load after loading a design element, ar_save before saving a design element, ar_tool when selecting a toolbar item and ar_zoom when changing the zoom factor. The module startup User Language program call method is most useful for automatic system parameter setup as well as for key programming and menu assignments. The element save and load program call methods can be used to save and restore element-specific parameters such as the zoom area, color setup, etc. The toolbar selection event must be used to start User Language programs which are linked to toolbar elements. The zoom event can be used to apply an update request to a design view management feature. Bartels User Language also provides system functions for performing key programming, changing menu assignments and defining toolbars. These powerful features can be applied for user interface modifications. Please note that a large number of additional functions included with the Autorouter menu are implemented through the User Language programs delivered with the BAE software. See the Bartels User Language Programmer's Guide for a detailed description of the Bartels User Language (chapter 4.2 lists all User Language programs provided with the BAE software). Neural Rule SystemA series of advanced Bartels AutoEngineer features affecting Autorouter behaviour and procedures are implemented through the Neural Rule System. See chapter 6.3.2 for the rule system applications provided with the PCB layout system. 4.5.5 Autorouter OptionsThe menu is used to define the design rules and technology requirements to be considered by the Autorouter. Option parameters can only be set before starting the Autorouting process (unless otherwise mentioned). On Autorouter security copies the current option parameter settings are stored to the currently processed job file. I.e., Autorouter options need not be redefined on subsequent Autorouter calls, unless parameter changes are really required for the layout to be automatically routed. Routing Grid, Standard Trace Width, Standard Minimum DistanceThe Bartels AutoEngineer works as a grid-based router unless the gridless router of the Autorouter (see below) is activated. The function from the menu is used to define the routing grid before starting the Autorouting process. Table 4-1 lists the selectable standard routing grids. Table 4-1: Autorouter Grids
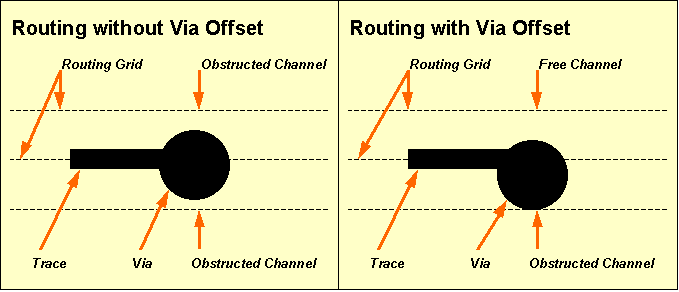
The default routing grid setting at the first Autorouter call for a particular layout is . Each routing grid change is stored with the layout and also sets the standard trace width and minimum clearance distance values to the default settings for that grid (see table 4-1 for the grid-specific default values). Both the standard trace width and the standard minimum distance can be changed after specifying a new routing grid (use functions and , respectively). Note however that the sum of trace width + minimum distance must not exceed the current routing grid; otherwise the Autorouter issues an error message when starting the routing process (note warnings such as and/or , and modify trace width and/or minimum distance until either of the messages or is issued). You should set the trace width and minimum distance values to 0.2mm each if you intend to route an SMD layout with 1/40 inch routing grid, since this allows the Autorouter to use the pin channels of SO packages. Note that the 1/60 inch routing grid (i.e., the complete routing matrix) is internally shifted by 1/120 inch, thus enabling the Autorouter to place two traces between adjacent pins of DIL packages which are placed on 1/10 or 1/20 inch grid. The option of the function can be used to specify arbitrary routing grids such as some metric grid for special pin grids. Arbitrary routing grid settings will set both the standard trace width and the minimum distance to half the value of the routing grid. I.e., a routing grid specification of e.g., 1.1mm will set the trace width and the minimum distance to 0.55mm each. The built-in off-grid recognition of the Bartels AutoEngineer allows for off-grid placement of pins and pre-routed traces. I.e., the Autorouter is able to connect objects which are not placed on the routing grid (e.g., plug pins on metric grid). Note however that on-grid items make the job much easier for the Autorouter since off-grid routing is quite time-consuming and could even prevent the Autorouter from connecting certain items in a simple way. It is recommended to use a reasonable grid for part placement to avoid off-grid pin placement and to enable pin channel routing for better routing results. Please note that smaller routing grids result in quadratic growth of memory requirements for the routing matrix, and that CPU time usage during the Autorouting process rises even more dramatically (due to a non-polynomial growth of the number of possible routing solutions). It is recommended to refrain from selecting unnecessary small routing grids. Some routing grid options support routing with via offset (see table 4-1). No via offset means that vias are placed in-line with the traces (i.e., on the routing grid). Routing with via offset means that vias can be shifted by half the routing grid at their placement. The choice to offset or not must be calculated by the user taking into consideration the routing grid, trace width, clearance distance and via size. Routing with via offset may well allow to use channels which would otherwise be occupied by in-line placed vias on adjacent grid channels. This can have a significant negative effect on the routing success (see figure 4-5 for an illustration). The via offsets are calculated for via diameters smaller than 1mm. It is recommended to refrain from routing with via offset when using larger vias since this could cause poor routing results.
Figure 4-5: Routing with or without Via Offset The standard trace width is the track width to be used for routing the connections. The standard trace width applies for all nets except for those where certain net attributes are defined. If a
Signal Layer Count and Layer AssignmentThe function from the menu is used to specify the number of signal layers to be simultaneously routed by the Autorouter. The signal layer count can range from 2 to 12. The default signal layer count for a particular layout corresponds with the top layer setting of that layout. The function is used to set the preferred routing direction (horizontal, vertical or all directions) for each routing layer. With the function it is also possible to define trace keepout layers (i.e., layers where routing is prohibited) or to remove layers from the routing layer list (which will decrement the signal layer count). The default layer assignments are horizontal for layer 1, vertical for layer 2, horizontal for layer 3, vertical for layer 4, etc. Changing the routing layer count with function resets the layer assignments. Routing layer numbering starts with signal layer 1 (solder side). The Autorouter simultaneously routes all routing layers. Single-layer boards can be routed with routing layer count 2 and routing layer 1 defined as prohibited layer. All objects placed on prohibited layers are considered by the Autorouter. I.e., via keepout areas on a double-sided layout can be defined by placing keepout areas on signal layer 3 of the layout, setting the routing layer count to 3, and defining routing layer 3 to be prohibited. The Autorouter would then use signal layers 1 and 2 for routing the traces and refrain from placing vias at positions where via pads would intersect with keepout areas on layer 3. The layer assignments (except for the signal layer count) can be changed between different router passes, i.e., without the need of restarting the complete routing process. Note however that restrictions introduced with layer assignment changes will never cause a deterioration of the current routing result at subsequent router passes. I.e., the Autorouter will try to but not necessarily remove all previously routed traces from prohibited layers, if those layers were available for routing before. Changing layer assignments between different router passes introduces highest flexibility at the routing of complex PCB technologies. Best success at the routing of certain multilayer SMT boards is often achieved when using outside layers (solder and component side) with highest priority for connecting SMD pins to inside signal layers. This can be accomplished with SMD Via Pre-Place passes to be subsequently activated with dynamically adapted layer assignments and increasing routing channel widths (use the and functions to apply single router passes). After completing the SMD Via Pre-Placement some Initial passes (with via and/or channel width restrictions) can be applied to route the signal inside layers only (prohibit the outside layers). Finally the outside layers can be released again for subsequent router passes such as Complete Initial pass, Optimizer, rip-up routing, etc. The Bartels AutoEngineer is capable of routing up to 12 power layers in addition to the signal layers. I.e., the Bartels AutoEngineer can rout multilayer designs with a total of up to 24 layers. The power layer routing algorithms are equipped with intelligent power plane detection features for split power plane routing. When routing power layers, the Autorouter correctly connects SMD pins to power layers and/or active copper areas defined on such power layers. Maximum Via CountThe function is used to set the maximum number of vias per circuit trace. The default maximum via count is 20. A maximum via count of 0 forces the Autorouter to rout the layout without vias. The maximum via count can be changed between different router passes, i.e., without the need of restarting the complete routing process. Note however that restrictions introduced with maximum via count changes will never cause a deterioration of the current routing result at subsequent router passes. I.e., the Autorouter will try to but not necessarily remove all previously placed vias. Via GridThe function is used to set the grid for placing vias to 1/10 or 1/20 inch. The option is used on default, thus allowing unrestricted via placement according to the current setting (see above). The via grid can be changed between different router passes without the need of restarting the complete routing process. Note however that restrictions introduced with the via grid changes will never cause a deterioration of the current routing result at subsequent router passes, i.e., the Autorouter will try to but not necessarily replace previously placed vias. Sub-Grid RoutingThe function is used to activate half-grid routing (option ). On default half-grid routing is deactivated (option ). Half-grid routing means that the Autorouter can alternatively use a routing grid shifted by half of the selected routing grid, e.g., half-grid routing with 1/40 inch routing grid can also utilize the 1/80 inch grid routing grid. The current standard trace width and minimum distance settings are not affected by the sub-grid routing option. Half-grid routing yields better use of regions nearby off-grid placed objects such as pin channels at off-grid placed parts, thus considerably increasing routability of dense layouts. Gridless Routing OptionA rule-driven gridless router is integrated to the Autorouter. Gridless routing is deactivated on default (option of the function from the menu). The rule-driven gridless router can be activated through the option from the function. The gridless router performs selective gridless routing, i.e., gridless routing is only applied locally where this yields better results in terms of routability and manufacturing optimization. With gridless routing activated, there are much more options for using off-grid pin channels, which might significantly increase the routability of complex layouts. Gridless routing generates straighter connections to off-grid placed pins, thus preventing from blocking adjacent pin channels and also performing more optimization for manufacturing. The mode allows for traces to leave the routing grid under virtually any condition and for minimum distance routing between off-grid pins, thus achieving significantly better routing results especially for dense SMT boards. The mode straightens connections to gridless placed pins and vias only locally and resumes and/or applies gridbased routing for normal traces. This mode is not capable of routing between offgrid placed pins where this otherwise would be possible in mode. WarningNote that gridless routing requires more main memory and computing power due to additional data structures (gridless priority tree) to be maintained during the routing process. Traces On-Grid/Off-GridThe function is used to set the trace corner cutting mode. On default trace corner cutting falls on half grid points (option ). The option forces trace corner angles onto the routing grid only, thus ensuring correct spacing between diagonal trace segments and pad corners. Figure 4-6 illustrates the effects of off-grid and on-grid trace corner cutting.
Figure 4-6: Routing Traces Ongrid/Offgrid Pin Contact ModeThe function is used to allow (option , default) or avoid (option ) pin corner routing. This feature works on approximately rectangle-shaped pads and controls whether traces can exit such pads at 45 degree angles or not. Routing with pin corner obstruction can produce better looking layouts, but could also impede 100% routing. Note that connecting pins with a size approximately equal to or smaller than the trace width could fail. The option should not be used with designs that include thick traces. Note also that bus routing can produce unpredictable results when switched to pin corner obstruction. 4.5.6 Autorouter ControlThe menu provides a series of functions for controlling the routing process. Optimizer PassesThe function is used to set the number of Optimizer routing passes to be automatically activated by the function after obtaining a 100% routing. The Optimizer passes count can range from 0 to 99; 2 Optimizer passes are activated on default. Router Cleanup, Optimizer CleanupThe function is used to activate (default option ) or deactivate (option ) cleanup passes during rip-up routing. The function is used to activate (default option ) or deactivate (option ) cleanup passes during optimization. When running cleanup passes (note message issued by the routing progress report), the Autorouter makes use of a unique pattern search recognition algorithm for identifying disturbing traces during rip-up and cross-net optimization. The Autorouter is able to select and remove disturbing traces during rip-up and perform cross-net changes during optimization. Cleanup during cross-net optimization requires more computing time, but dramatically reduces via counts and thus is also called if the rip-up router (temporarily) fails to find an acceptable solution. It is recommended to refrain from turning off cleanup when running rip-up on complex designs or optimizing dense boards. Turning cleanup off results in sequential processing of the connections and can produce contenting results when running final Optimizer passes on certain layouts (however, more passes are then required for pushing and/or straightening trace bunches). Rip-Up Trees, Rip-Up Depth, Rip-Up RetriesThe function sets the maximum number of traces allowed to be simultaneously ripped up per rip-up cycle. The rip-up trees number is set to 2 on default, and can range from 1 to 9. The function is used to control the persistence of the rip-up process. A high value will result in higher persistence. The rip-up depth value can range from 1 to 999, and is set to 50 on default. The function sets the maximum number of rip-up retries for routing a particular trace, thus defining the local rip-up router intensity. The rip-up retries number is set to 2 on default, and can range from 0 to 99. Higher rip-up control parameters increase the persistence and intensity of the rip-up routing process, and thus can be used for special problems such as completing 100% routing without intermediate optimizer passes or for routability check. Once 99.5% routing completion is achieved, the Rip-Up parameters are automatically increased to Rip-Up Trees 6, Rip-Up Level 200 and Rip-Up Retries 10, unless higher values are already set. This helps to avoid the time-consuming Optimizer cleanup passes between Rip-Up passes if only a few open connections are left. SMD Via Pre-PlaceThe function is used to activate (option ) or deactivate (default option ) the initial routing algorithm for connecting SMD pins to signal inside layers. With SMD via pre-placement activated the function will start with the SMD via pre-place initial routing pass. The SMD via pre-placer will - as far as possible and/or meaningful - generate short trace connections to vias for those SMD pins to be wired. At SMD fanout routing, routing directions result from the shapes and positions of the corresponding SMD pads; i.e., the SMD fanout routing algorithm ignores layer-specific routing direction preferences to refrain from blocking PLCC/SMD pin channels and or PLCC/SMD pins. The SMD via pre-routing pass is intended for preventing the Autorouter from extensively using the SMD outside layers at an early stage of the routing process, thus involving earlier 100% routing success in a wide range of SMT designs. The SMD via router does not (re-)rout SMD pins which are already connected to fixed traces, and redundant SMD via connections are later eliminated by the Optimizer. Placement Optimization during Rip-Up RoutingA feature for performing placement optimizations is integrated to the rip-up router of the Autorouter. The menu function can be used to activate (option ) or deactivate (option ) placement optimization during rip-up routing. With , the rip-up router performs pin/gate/groups swaps to increase routability. This can significantly reduce the time required for achieving a 100% autorouting completion. Placement optimization is selective, i.e., swaps with a high potential to simplify the routing problem are carried with higher priority. Swap operations which cause a deterioration of the current routing result rejected by the router's backtracking process. Only unfixed parts are subject to swap operations, and the admissibility of any pin/gate swap is controlled through the corresponding logical library part definitions. Pin/gate swaps create a backannotation request which triggers automatic when loading SCM plans to the Schematic Editor (see chapter 2.7). requests also prevent the Packager from forward annotation without confirmation (see chapter 3.2.3). Security CopyThe function is used to activate (default) or deactivate automatic security copy of intermediate routing results. 4.5.7 Autorouter StrategyThe menu provides functions for setting routing strategies such as via cost, pin channel cost, packing cost, bus bending cost, dynamic density cost, etc. These settings should be used with care. Only change one or two at a time. Poor routing results are often found to be caused by random strategy parameter settings. The default settings will work best in the vast majority of cases. It is strongly recommended to change strategy parameters in special cases only and to refrain from using extreme values. There are strong mutual dependencies between different Autorouter strategy parameters. A high via cost value (for eliminating vias) will necessarily result in more ignorance of routing direction preferences, thus compensating the cost factor for keeping preferred routing directions. Note also that strategy parameters only define subordinate options for the Autorouting process, due to the fact that it is much more important to achieve a 100% routing result instead of, e.g., keeping preferred routing directions. I.e., some cost factors may be completely ignored during initial routing and rip-up and will only be considered by the Optimizer. Tabelle 4-2 provides an overview to all of the routing parameters which can be set from the Strategy menu. Table 4-2: Autorouter Strategy Parameters
Optimize DirectionThe function is used to designate the Optimizer strategy. The default option causes the Optimizer to ignore layer-specific preferred routing directions in order to obtain the greatest reduction of vias. The option causes the Optimizer to consider layer-specific preferred routing directions, which could increase the number of vias. The option causes the Optimizer to prefer diagonal (45 degree) routing where appropriate. Via CostThe setting is used by the Router and the Optimizer. A high via cost factor results in fewer vias but more complex circuit traces. A low via cost factor permits more vias within the restraint of the maximum via count (see above). The via cost value can range from 2 to 20; the default value is 10. Pin Channel CostThe setting is used by the Router only. A high pin channel cost factor results in infrequent use of pin channels. A low pin channel cost factor permits the frequent use of pin channels. Pin channels are the regions between adjacent part pins. The pin channel cost value can range from 2 to 20; the default value is 10. Counter Direction CostThe setting is used by the Router and the Optimizer. A high counter direction cost factor results in strict adherence to the layer-specific preferred routing directions. A low cost factor permits frequent variations from the preferred direction. The counter direction cost value can range from 0 to 5; the default value is 1. Direction Change CostThe setting is used by the Optimizer only. A high direction change cost factor results in less circuit corners. A low direction change cost factor permits frequent changes in routing directions. The direction change cost value can range from 0 to 5; the default value is 2. Packing CostThe setting is used by the Router only. A high packing cost factor results in high bundling of circuit traces. A low packing cost factor will result in wider distribution of circuit traces. The packing cost value can range from 0 to 5; the default value is 1. Dynamic Density CostThe setting is used by the Router only. The dynamic density cost factor controls the global distribution of circuit traces over the entire layout. A high dynamic density cost factor results in a more even distribution of the circuit traces. A low cost factor gives more influence to routing costs. The dynamic density cost value can range from 0 to 50; the default value is 10. Bus Bending CostThe setting is used by the Router only. The bus bending cost factor controls the bending of traces after passing a pin channel. A high bus bending cost factor results in high priority of bending. A low bus bending cost factor results in less bending. The bus bending cost value can range from 0 to 5; the default value is 2. Rip-Up Distance CostThe and settings are used by the Router during rip-up. The rip-up distance-1 cost factor controls the use of channels left by ripped up traces in the near distance (0 to 1 grid point). A high distance-1 cost factor results in less use of these channels, thus forcing more local changes during rip-up and retry routing. The rip-up distance-1 cost value can range from 0 to 10; the default value is 5. The rip-up distance-2 cost factor controls the use of channels left by ripped up traces in the far distance (2 grid points). A high distance-2 cost factor results in less use of these channels, thus forcing more global changes during rip-up and retry routing. The rip-up distance-2 cost value can range from 0 to 10; the default value is 2. Trace Crossing CostThe is used to set the trace transition cost factor, which is considered by the Router and the Optimizer to control cleanup pattern recognition during multi-net optimization. A high trace crossing cost factor allows for a more complex routing with more traces crossing each other, thus also producing more vias. A low trace crossing cost factor leads to increased (and more time-consuming) analysis during cross-net optimization, thus eliminating more vias. The trace crossing cost value can range from 2 to 100; the default value is 10. Diagonal Routing CostThe Optimizer considers the setting on routing layers where the routing option is selected (see function above). A high diagonal routing cost factor causes the Optimizer to use more diagonal routes. A low diagonal routing cost factor results in less diagonal routing. The diagonal cost value can range from 0 to 10; the default value is 5. Off-Grid Routing CostThe setting is used by the Router and the Optimizer, and is considered when routing with the half-grid option (see above). A high off-grid routing cost factor results in less use of the sub-grid. A low off-grid routing cost factor permits frequent use of the sub-grid. The off-grid routing cost value can range from 0 to 5; the default value is 2. Prefered Grid, Anti-Prefered Grid CostThe parameter is used for setting a prefered routing grid. values range from 0 to 7; 0 switches the prefered grid of, higher values cause the router to pefer the use of every 2nd, 4th, 8th, 16th, 32nd, 64th or 128th grid point. The parameter (value range 1 to 10, default value 1) is used to set a cost factor for routing outside the prefered grid. Prefered grid routing spreads the routing density and takes only effect on layouts with (large) unoccupied areas. Prefered grid routing parameters should be set before the first Autorouter run. Later changes to these parameters require multiple time-consuming optimizer runs. Note also that high cost factors could cause detouring routes. Outside Net Type Area Cost (BAE HighEnd)The strategy parameter is only supported in BAE HighEnd. A high cost factor prevents nets from being routed outside their net-specific routing areas, a low cost factor allows for nets to be routed outside their routing areas more frequently. The net area cost factor can range from 0 to 5; the default value is 1. 4.5.8 Autorouter FunctionsThe Autorouter supports various routing algorithms and autorouter procedures such as , initial routing, SMD fanout routing, rip-up/retry routing, , re-entrant routing, etc. These routing procedures can be activated from the menu (functions , , , , ), the menu ( function) and the menu (, ). Activating an autorouting procedure after changing basic routing parameters such as signal layer count, routing grid, half-grid option, standard trace width, standard minimum distance, or pin contact mode discards the currently unfixed traces and vias and (re-)routes the layout with changed options. The autorouting procedures in BAE HighEnd are some 30 percent faster than in BAE Professional. This performance boost is mainly achieved by optimized internal data structures (HighSpeed Kernel) in BAE HighEnd. The current routing result is displayed graphically and through statistical readouts whilst routing is in progress. The routing process can be stopped at any time by pressing a key, causing the Autorouter to revert to the (currently best) routing result. Single-Pass Initial RoutingThe single-pass Initial Router performs signal trace routing considering preferred routing directions, a certain channel width and a maximum via count per two-point connection. The channel width is the maximum permitted deviance from preferred directions. The channel width is specified in routing grid steps. A zero channel width removes the restraints on deviating from the preferred direction, i.e., the entire board area is then released for routing. The maximum via count used by the Initial Router will never exceed the value set with the function from the menu (see above). The Initial Router places traces close together, thus using minimum space in order to leave more room for subsequent traces (trace hugging). The Initial Router also uses advanced techniques of copper sharing where appropriate. The Initial Router processes power layer connections and attributed nets (with non-default routing widths, minimum distance settings and routing priorities) with highest priority. Complete Initial RoutingThe Complete Initial Router automatically activates four Initial Router passes to rout all open connections which can be routed without rip-up and retry. With each Initial Router pass the channel width and the maximum via count is increased. The first Initial Router pass runs with maximum via count zero. The last Initial Router pass runs with channel width zero and a maximum via count according to the parameter set with the function from the menu (see above). Rip-Up/Retry RouterThe Rip-Up/Retry Router attempts to route all open connections until the board is completely routed. Connections which can be routed without rip-up are routed first. Then the Rip-Up/Retry Router selects and eliminates traces (rip-up) and re-routes them to create space for the unroutes. For this purpose, the router gathers information on dense board areas and increases the cost of routing in such areas. The Rip-Up/Retry Router is supported by a sophisticated array of heuristic strategy parameters. The cost factors can be dynamically adapted to the current routing problem, thus controlling the "price" of strategies such as via placement, routing against preferred directions, using pin channels, etc. It is strongly recommended to refrain from modifying these strategies, unless the routing success is not what would be expected. When changing cost factors, slight adjustments to a few can make significant improvements or make things much worse. The Rip-Up/Retry Router is guarded by a unique backtracking algorithm, which not only prevents from a deterioration of the result or a dead-lock during rip-up or optimization but also is able to exploit a new and/or better routing solution. The Rip-Up/Retry Router automatically activates intermediate Optimizer passes if a single rip-up pass fails to achieve 100% routing success. OptimizerThe function is used to start a single pass. The usually is applied after 100% routing to optimize the layout for manufacturing. The eliminates redundant vias, smoothes traces and attempts to rout open connections. Channel width zero is used during optimization and the maximum via count is set to the same value as defined with the function from the menu (see above). SMD Via Pre-Placementis a special initial routing algorithm for connecting SMD pins to signal inside layers. The SMD via pre-placer generates short trace connections to vias for those SMD pins to be wired. With SMD fanout routing passes, a channel width setting is required and routing directions result from the shapes and positions of the corresponding SMD pads. The SMD via pre-routing pass prevents the Autorouter from extensively using the SMD outside layers at an early stage of the routing process. This strategy achieves earlier 100% routing success in a wide range of SMT designs. Redundant via connections created by are later eliminated by the . Full AutorouterThe main menu function is used to start a complete Autorouting process including all router passes such as SMD Via Pre-Placement (optionally), complete initial routing, rip-up/retry routing (if necessary) and optimization. This is the standard procedure for performing complete routing of a board. The number of final passes can be set with the function from the menu (see above). The SMD Via Pre-Placer will only be activated if the option has been selected with the function from the menu. Batch Setup and Batch StartThe function from the Standard Autorouter main menu is used to start a routing process with different user-defined router passes. The function is used to schedule up to ten of the following autorouting procedures to be subsequently processed with the function:
pass requires a routing channel width specification and a maximum via count setting. requires a routing channel width specification. requires the number of required passes (up to 999). Single Net RoutingThe function from the Autorouter menu activates the single net router. The net and/or connection to be autorouted by the single net router can be selected by mouse-clicking some pin or pre-routed trace of the desired net. The single net router is commonly used for pre-routing power supply signals or critical nets with specific preferences for trace widths, clearance, layer assignments, etc. Component RoutingThe function from the menu can be used to rout mouse-selectable parts, i.e., to autoroute all nets connected to the selected component. Fully Automated Placement and RoutingThe function from the can be used to activate the and function sequence. thus allowing for fully automated layout placement and routing. Net-specific Airline Display and Net Group RoutingThe from the menu provides options for controlling net-specific airline display. Nets which are faded-out from airline display are excluded from the autorouting process. Net-specific airline display settings can be changed between router passes. This allows for consecutive router passes to route different groups of nets such as busses of a certain circuit block or signals with certain attributes with specific routing options for preferred routing directions, maximum via counts, etc.. Area/Block Routing in BAE HighEndThe
Autorouter of
BAE HighEnd considers net-specific routing areas to be defined as documentary areas on signal layers with rule assignments containing a
4.5.9 Using the AutorouterStarting the AutorouterYou should first start the
Layout Editor and load the layout
Setting Autorouter OptionsThe following operations will show how to apply certain router passes for routing our example job using three signal layers. Use the following commands to set the signal layer count to 3:
Use the following commands to select 1/40 inch routing grid without via offset, and set the standard trace width and the minimum distance to 0.3mm each:
View, Layout DisplayUse the following commands to change trace clipping to 0.1mm and activate the function:
Router BatchUse the following commands to define a router batch process consisting of with channel width 4, , and a single pass:
A dash string input ("-") to the prompt can be used to remove the selected router pass from the batch. The sequence of router passes to be processed by corresponds with the sequence of router passes defined with . Use the command to run all router passes previously defined with the function:
Router batches can also be started with the button from the dialog without having to leave the dialog and subsequently calling the function. The routing process for our example starts with . Subsequently, a pass is performed. The will end up with 100% routing success. Finally, one pass is activated. Each routing pass automatically saves its routing result. The following message is displayed in the status line after finishing the last pass: Max. 53 of 53 Routes (Pins: 76, Vias: 5) The layout is now completely routed with 5 vias placed by the Autorouter. OptimizerUse the following commands to run an additional pass (without pattern recognition, but with high priority for considering preferred routing directions):
Note how the pass routes traces according to preferred routing directions, albeit at the price of an increased via count of 13. Exiting the AutorouterYou can exit the Autorouter using one of the , or functions from the menu. exits to the operating system. saves the currently processed layout and returns to the BAE main shell. saves the currently processed layout and returns to the Layout Editor. Use the function from the menu to return to the Layout Editor:
Re-entrant RoutingUsing three routing layers for our simple example appears to be rather wasteful. We want to route the layout again, now with two routing layers instead of three. We also want to apply to keep as much of the current routing result as possible. Use the following commands to switch back to the Autorouter:
Use the following commands to reduce the signal layer count to 2 and reload the data produced by the preceding router pass:
The function fails to load the traces previously routed on layer 3 since the signal layer count is now set to 2. I.e., the router progress message in the status line will indicate 9 open connections (max. 44 of 53 routes) and a via count of 8 (instead of 13) after finishing the function. Use the following commands to switch off preferred routing direction optimization and start the to complete the routing:
The completes the routing, now on two instead of three signal layers and with 6 vias. Use the following commands to return to the Layout Editor:
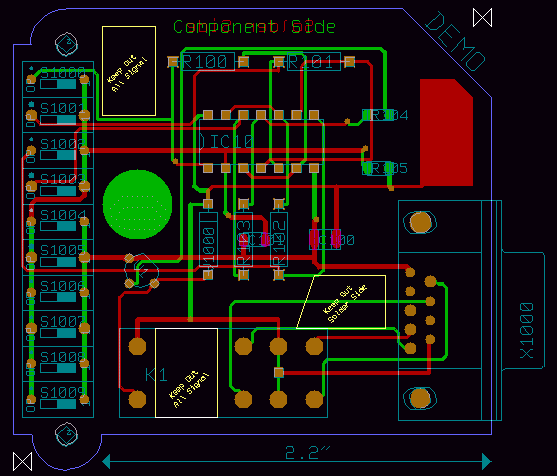
After correctly performing all operations of this chapter, the PCB layout example should look like the one shown in figure 4-7.
Figure 4-7: Layout after Autorouting
Autorouter |
|||||||||||||||||||||||||||||||||||||||||||||||||||||||||||||||||||||||||||||||||||||||||||||||||||||||||||||||||||||||||||||||||||||||||||||||||||||||||||||||||||||||||||||||||||||||||||||||||||||||||||||||||||||||||||||||||||||||||||||||||||||||||||||||||||||||||||||||||||||||||||||||||||||||||||||||||||||||||||||||||||||||||||||||||||||||||||||||||||||||||
| |||||