|
The
Bartels AutoEngineer is shipped with a series of extensive SCM libraries. Nevertheless, you might require a certain symbol which has not yet been defined in these libraries. This section shows in detail how to create SCM library symbols. Some example symbols are created step-by-step starting with the lowest DDB hierarchy level. I.e., first of all a pin symbol (on marker level) is defined, subsequently an SCM part symbol (on symbol level) is defined and, finally, two label symbols (on label level) are defined. All these symbols will be stored to a DDB file named
demo.ddb. Use the following commands to move to the BAE examples directory (e.g.,
c:\baejobs), and start the
Bartels AutoEngineer:
>  C:
>  cd c:\baejobs
>  bae
> cd c:\baejobs
> bae
The BAE main menu is activated, and you can start the
Schematic Editor with the following command:
| Schematic |  |
The
Schematic Editor is actiavted, and you can create SCM library elements. Before generating your own symbols you should familiarize yourself with the conventions used for circuit symbol design. Company-specific conventions are frequently to be considered with regard to symbol size, pin naming and grouping (input, output, clock, reset, etc.), text size, pin placement grids, symbol origin, etc. Most important for the placement of a symbol on superior design levels are the symbol origin and the pin placement grid. It is advisable to choose a pin placement grid (e.g., 2mm) which allows for easy pin connections in the grid used on SCM sheet level (e.g., 1mm); the symbol origin should be set accordingly.
Figure 2-1 shows the SCM library symbols to be created in the following sections.
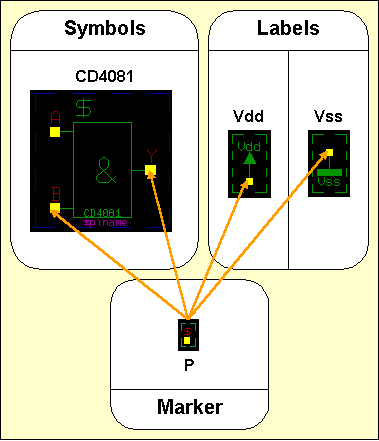
Figure 2-1: SCM Library Symbols
2.2.1 Creating SCM Markers
Creating a new Marker Symbol
Use the following commands to create a new marker element named
p with a size of 10 by 10 mm in the
demo.ddb DDB file:
| File | |
| New | |
| Marker | |
| File Name ? | demo |
| Element Name ? | p |
| Element Width (mm/") ? | 10 |
| Element Height (mm/") ? | 10 |
The display now shows a square frame with a cross in the middle. The frame describes the element boundaries of the marker, and the cross marks the position of the element origin.
Defining the Contact Area
Contact areas on pin symbols are utilized for displaying net list changes on SCM sheet level. As soon as a pin is connected correctly, the contact area defined on the corresponding pin marker will disappear. Contact areas will not be plotted.
Use the following commands to define a square contact area with an edge length of 1mm on the currently loaded marker element:
| Graphic | |
| Add Contact Area | |
| Jump Absolute | |
| Absolute X Coordinate (mm/") ? | 0.5 |
| Absolute Y Coordinate (mm/") ? | 0.5 |
| Jump Relative | |
| Relative X Coordinate (mm/") ? | -1 |
| Relative Y Coordinate (mm/") ? | 0 |
| Jump Relative | |
| Relative X Coordinate (mm/") ? | 0 |
| Relative Y Coordinate (mm/") ? | -1 |
| Jump Relative | |
| Relative X Coordinate (mm/") ? | 1 |
| Relative Y Coordinate (mm/") ? | 0 |
| Done | |
Defining the Reference Designator
The graphical design of the marker symbol is completed now. Nevertheless a pin reference designator should be defined on the marker. For this purpose the
$ text string is utilized as a variable for indicating the name of corresponding references on superior hierarchy levels. I.e., a
$ text string placed on marker level displays pertinent pin reference names on symbol level, a
$ text string placed on symbol level displays pertinent part reference names on SCM sheet level, etc.
Use the following commands to place the
$ text with a size of 2mm at coordinate [-0.5,0.5]:
| Text | |
| Add Text | |
| Text ? | $ |
| Text Size | |
| Text Size ( 4.00mm) ? | 2 |
| Jump Absolute | |
| Absolute X Coordinate (mm/") ? | -0.5 |
| Absolute Y Coordinate (mm/") ? | 0.5 |
Modifying the Element Boundaries
The marker symbol's element boundaries should be reduced in order to enclose the marker definition as densely as possible. This is accomplished with the following commands:
| Settings | |
| Upper/Right Border | |
| Absolute X Coordinate (mm/") ? | 0 |
| Absolute Y Coordinate (mm/") ? | 0 |
| Lower/Left Border | |
| Absolute X Coordinate (mm/") ? | 0 |
| Absolute Y Coordinate (mm/") ? | 0 |
Saving the Marker Symbol
Use the following commands to save the marker symbol:
| File | |
| Save Element | |
Now the new marker symbol named
p is completely defined and stored to the DDB file
demo.ddb. Use the following commands to list the marker(s) defined in
demo.ddb:
| File | |
| File Contents | |
| Marker | |
| File Name ? | |
An empty string to the file name prompt causes the system to use the file name of the currently loaded element (i.e., demo.ddb in our example). The system should produce the following listing of the markers contained in
demo.ddb:
Type : Marker / File : demo.ddb

:p                   - End -
Hit the spacebar to continue.
2.2.2 Creating SCM Symbols
In this section we will create a new SCM library symbol named
CD4081. This symbol can be created in a new or in an already existing library and/or job file. In our example we will store the new symbol to the currently processed DDB file named
demo.ddb.
With the
CD4081, it is advisable not to create an SCM symbol for the complete part, but to define the
CD4081 as single gate which then occurs four times in the corresponding package. The operations in the following section will produce the symbol definition shown in
figure 2-2.
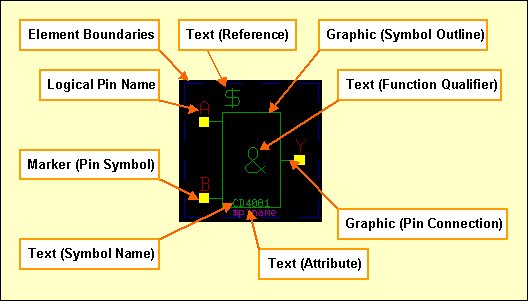
Figure 2-2: SCM Symbol CD4081
Creating a new SCM Symbol
Use the following commands to create a new symbol named
CD4081 in the DDB file
demo.ddb (an empty string input is sufficient for the specification of the DDB file name if an element of file
demo.ddb is still loaded):
| File | |
| New | |
| Symbol | |
| File Name ? | demo |
| Element Name ? | cd4081 |
| Sheet (C)omplex/(L)ogic/(G)ate/(D)iscrete/(M)an. ? | g |
The symbol size determines the element's size and boundary. The system does not allow for the placement of objects outside the element boundaries, however, the boundary can modified lateron. You can either enter the element width and element height manually, or simply select one of the following predefined symbol sizes:
| Option | Element/Symbol Size |
|---|
|
| 50 × 90 mm |
|
| 30 × 30 mm |
|
| 15 × 15 mm |
|
| 15 × 10 mm |
Selecting the Pin Symbol
In the previous section, we defined a marker symbol with the name
p. Use the following commands to select this marker as pin symbol for subsequent pin definitions on the currently loaded SCM symbol:
| Settings | |
| Settings | |
| Select Pin Symbol | |
| Pin Marker Name (pin) ? | p |
Parameter settings as shown above can be utilized for assigning different pin symbols on a single SCM part symbol. On default, the system uses the marker named
pin (make sure that this marker is available in the currently accessed SCM default symbol library; see also the
SCMDEFLIBRARY command of the
bsetup utility program).
Placing the Pins
Now the pins of the symbol are to be defined. The
CD4081 part contains 4 equivalent AND gates with input pins
A and
B and output pin
Y. These are the logical pin names (other logical pins could be named
INPUT,
OUT,
CLK, etc.). Logical to physical pin assignment is applied with a corresponding logical library definition which can be translated with the
loglib utility program (see the
Packager description in
chapter 3.2 of this manual for more details). Equal names for logical and physical pins (1:1 pin assignments) are also allowed.
The marker level is the lowest SCM database hierarchy level. Each SCM part symbol consists of markers defining the part pins. I.e., the marker is the part symbol to be used on symbol level. This principle is applied on all database levels, thus enabling basic functions such as symbol placement to work in different database levels. Placing markers on symbol level will produce SCM part symbols, whilst placing SCM symbols on SCM sheet level produces circuitry.
Use the following commands to place the pins
A,
B and
Y at coordinates [2,10], [2,2] and [12,6] on the currently loaded symbol:
| Symbols | |
| Add Symbol | |
| Part Name ? | a |
| Move to [2,10] | |
| Add Symbol | |
| Part Name ? | b |
| Move to [2,2] | |
| Add Symbol | |
| Part Name ? | y |
| Move to [12,6] | |
The markers placed with the commands above are representing the pins
A,
B and
Y of the
CD4081 gate. Instant placement coordinates display is provided in the status line and/or info field whilst performing interactive placement operations.
A slash
/ preceding the part name causes a line to be displayed on top of the name and/or text. This feature can be used to name negated signals and/or pin names such as
/y. This also works for normal text.
Graphic
The symbol now consists of all pin definitions required for the
CD4081 gate, but symbol geometry and/or graphical information for documentation purposes such as symbol outline, pin connection designators, function indicator, etc. is still missing.
Use the following commands to define a symbol outline for the
CD4081:
| Graphic | |
| Add Graphic Line | |
| Move to [4,1] | |
| Move to [4,11] | |
| Move to [10,11] | |
| Move to [10,1] | |
| Move to [4,1] | |
| Done | |
Use the following commands to draw a graphic line connecting pin
A with the symbol outline:
| Graphic | |
| Add Graphic Line | |
| Move to Pin "A", [2,10] | |
| Move to [4,10] | |
| Done | |
With the commands above a horizontal line has been drawn from pin
A to the symbol outline, thus indicating that pin
A is defined on symbol
CD4081. Use the following commands to connect also pin
B and pin
Y with the symbol outline:
| Graphic | |
| Copy Graphic | |
| Move to Pin "A", [2,10] | |
| Move to Pin "B", [2,2] | |
| Copy Graphic | |
| Move to Pin "A", [2,10] | |
| Move to [10,6] | |
Text and Attributes
The graphical design of the
CD4081 part symbol is completed now. Nevertheless, some texts should be defined on the symbol. First of all a reference designator should be placed on the symbol. For this purpose, the
$ text string is utilized as a variable for indicating the name of corresponding references on superior hierarchy levels. I.e., a
$ text string placed on symbol level will display pertinent part reference names (e.g.,
IC01,
R20,
V2) on the circuit drawing.
Use the following commands to place the
$ text string with a size of 3mm on the symbol:
| Text | |
| Add Text | |
| Text ? | $ |
| Text Size | |
| Text Size ( 2.00mm) ? | 3 |
| Move to [4,11] | |
Use the following commands to place the
& string (text size 4mm) for denoting the AND gate function of the symbol:
| Text | |
| Add Text | |
| Text ? | & |
| Text Size | |
| Text Size ( 3.00mm) ? | 4 |
| Move to [6,4] | |
Use the following commands to place the gate name
CD4081 with a text size of 1mm:
| Text | |
| Add Text | |
| Text ? | CD4081 |
| Text Size | |
| Text Size ( 4.00mm) ? | 1 |
| Move to [5,1] | |
Use the following commands to define a commentary text referring the
$plname attribute (text size 1mm is still activated):
| Text | |
| Add Text | |
| Text ? | $plname |
| Commentary Text | |
| Move to [5,0] | |
The
Schematic Editor distinguishes between standard and commentary text. Both standard text and commentary text are displayed on the screen, but only standard text will be plotted, thus featuring a mechanism of fading out certain text and/or attributes on the generation of plot data.
Texts can also be defined with frames. Such definitions are possible with the
,
and
options from the submenu to be activated with the right mouse button whilst moving texts with the
,
and/or
function.
creates a surrounding box at 1/8 text height distance.
creates a surrounding box at 1/4 text height distance.
removes the vertical frame line at the text origin.
can be applied to define labels with dynamically adjusted text frames to be attached to connections. Using large pens for plot outputs can cause the negation lines of small texts being merged with text frames. The
option resets all text frame definitions.
The submenus of the
,
and
functions also provide the
and
options for switching the selected text into norotate mode and/or center aligning the text at its placement position. Text in norotate mode is displayed and/or plotted without rotation on any database hierarchy level. The
and
text modes can be reset by applying the
option from the same submenu.
Bartels AutoEngineer supports arbitrary part attributes on symbol level. A particular attribute is defined by a text consisting of the
$ character followed by the (lowercase) attribute name. Attributes are like variables, i.e., on SCM sheet level, values can be assigned to attributes. The attributes listed in
table 2-1 have special meanings due to BAE-specific conventions.
Table 2-1: Special BAE Attributes
| Attribute Name | Function/Meaning |
|---|
$ | Reference Name |
$$ | Logical Reference Name |
$llname | Logical Library Name |
$plname | Physical Library Name
(and/or Alternate Layout Part Package Types) |
$ulname | Used Library Name
(Alternate Layout Part Package Type Assignment) |
$rpname | Requested Part Name |
$rbname | Requested Backannotated Part Name |
$gp | Gate Pin |
$blkname | Hierarchical Block Name |
$pageref | SCM Label Sheet Reference Name List |
$pagecref | SCM Label Sheet Reference Comment List |
$orgname | Original/internal SCM symbol/part name(s) of layout part |
$pagename | Schematic sheet name(s) of layout part |
$blkrname | Schematic block symbol reference name(s) of layout part |
$rlname | Requested Logical Library Name |
$rlext | Requested Logical Library Name Extension |
$val | Value |
$pow | Power |
$type | Component Type |
$comment | Comment (English) |
$commentge | Comment (German) |
$manufacturer | Component Manufacturer |
$partside | Part Side (top = unmirrored, bottom = mirrored) |
$pltbaeversion | Bartels AutoEngineer Software Version Number (read-only) |
$pltbaebuild | Bartels AutoEngineer Software Build Number (read-only) |
$pltfname | Project File Path Name |
$Pltfname | Project File Path Name (uppercase) |
$pltfsname | Project File Name (without Directory Path) |
$Pltfsname | Project File Name (uppercase, without Directory Path) |
$pltpagecnt | Project SCM Sheet Count |
$pltename | Element Name |
$Pltename | Element Name (uppercase) |
$pltdatede | Current Date (German Format) |
$pltdateus | Current Date (US Format) |
$pltdate2de | Current Date (German Format; two-digit year display) |
$pltdate2us | Current Date (US Format; two-digit year display) |
$plttime | Current Time |
$pltsdatede | SCM/Layout Save Date (German Format) |
$pltsdateus | SCM/Layout Save Date (US Format) |
$pltsdate2de | SCM/Layout Save Date (German Format; two-digit year display) |
$pltsdate2us | SCM/Layout Save Date (US Format; two-digit year display) |
$pltstime | SCM/Layout Save Time |
$pltpname | Layout element name for last Packager run |
$Pltpname | Layout element name for last Packager run (uppercase) |
$pltpdatede | Date (German Format) of last Packager run |
$pltpdateus | Date (US Format) of last Packager run |
$pltpdate2de | Date (German Format; two-digit year display) of last Packager run |
$pltpdate2us | Date (US Format; two-digit year display) of last Packager run |
$pltptime | Time of last Packager run |
$pltcname | Layout Element Name |
$pltcdatede | Date of last name update (German Format) |
$pltcdateus | Date of last name update (US Format) |
$pltcdate2de | Date of last name update (German Format; two-digit year display) |
$pltcdate2us | Date of last name update (US Format; two-digit year display) |
$pltctime | Time of last name update |
$pltfbname | File Base Name - Element-specific Project File Name without .ddb extension |
$Pltfbname | File Base Name - Element-specific Project File Name without .ddb extension (uppercase) |
$pltfbsname | File Base Short Name - Element-specific Project File Name without .ddb extension and directory path |
$Pltfbsname | File Base Short Name - Element-specific Project File Name without .ddb extension and directory path (uppercase) |
$pltecomment | DDB Element Comment - Element-specific comment text |
$drcblk | Design Rule Check Block (Pin/Net Attribute) |
$net | Pin Net Name |
$netname | Net Name (Net Attribute) |
$nettype | Net Type (Pin/Net Attribute) |
$powpin | Power Pin Definition (Pin Attribute) |
$viastk | Via Padstack Type (Net Attribute) |
$notest | Exclusion from Automatic Test Point Generation (Net Attribut) |
$routdis | Exclusion from Autorouting Process (Net Attribute) |
$layers | Autorouting Layers (Net Attribute) |
$@ | Layout Part Name (Padstack Attribute) |
The
$pltbaeversion and
$pltbaebuild display the
Bartels AutoEngineer software version and build numbers. This allows for the inclusion of software version information on schematic plans as required for ISO certification.
The
$,
$llname,
$plname,
$gp,
$ulname and
$blkname attributes are automatically processed by the system. The reference designator attribute
($) is replaced with the name of the referenced symbol on the superior hierarchy level. On SCM sheet level, the part and/or pin names produced by the
Packager are displayed through the
$ attribute.
$$ attribute definitions on SCM symbol level can be used to retain logical SCM part name display on SCM sheet level after
Packager processing.
$$ attribute definitions on SCM marker level can be used to retain logical SCM symbol pin names display on SCM sheet level
after Packager processing.
Symbol level
$llname text definitions are substituted with symbol macro names on SCM plan level. The
Packager automatically assigns the
$llname attribute value, i.e., the
$llname attribute is not available for interactive and/or explicit attribute value assigments. Symbol name display through
$llname text definitions on SCM symbol label eliminate the need for redefining symbol name texts when creating new SCM symbols from existing SCM symbols.
The logical library name
($llname) can also be used for displaying SCM symbol names on the layout. The
Packager automatically transfers SCM symbol pin names to the
$llname pin attribute, thus allowing logical pin name display in the layout through
$llname text definitions on padstack level.
The physical library name
($plname) is used for assigning non-default layout packages
and/or alternative layout part package types.
I.e., selectable SCM symbols can be assigned to layout packages different from the logical library default assignment (e.g., a
so14 SMD package could be used instead of the default
dil14 by assigning the value
so14 to the
$plname attribute,
or a choice of layout package types could be passed to the layout system through a
[dil14,so14] $plname attribute value assignment; see the descriptions of the
loglib utility program and the
Packager for more details).
The
transfers layout part package type assignments back onto
$ulname (Used Library Name) SCM symbol attributes, thus allowing for alternate layout part package type assignments display and/or query on SCM plan level.
The requested part name
($rpname) is used for forcing the packaging of certain SCM symbols to certain layout parts (e.g., assignment to part
IC28 instead of the automatically generated assignment); this function is required for special part definitions consisting of different SCM symbols such as relays with strip and contact, opamps with variable power supply, etc.
The requested backannotated part name
($rbname) provides the same functionality like
$rpname, but without prohibiting subsequent layout part name changes. I.e., the
Layout Editor allows for
$rbname part names to be changed and the
transfers changed layout part names back onto the
$rbname attributes of the corresponding SCM symbols.
The gate pin
($gp) attribute can be used to assign SCM symbols to layout gate positions by setting the
$gp value to the desired gate's first pin name from the
xlat command of the corresponding logical library definition (see also
loglib). When using
$gp assignments, the
$gp value should be set for all gates of the layout part to avoid gate assignment conflicts. The
$gp attribute allows for specific assignments of dual operation amplifier components, and it can even be used to define connector pin symbols for single pins of multi-pin connectors where each pin is defined as a gate and the
$gp attribute specifies the name of the connector pin. Gate and pins assigned through the
$gp attribute are excluded from layout pin/gate swaps.
The hierarchical block name
($blkname) is used for hierarchical circuit design; corresponding attribute values are automatically set by the
Packager denoting the name of the hierarchical block where a certain part is referenced from.
The
$pltpagecnt can be used in the schematics to display the total number of schematic sheets of the current project.
On SCM sheet level, label level
$pageref text definitions are substituted with the list of all SCM sheets on which the corresponding net is used.
On SCM sheet level, label level
$pagecref text definitions are substituted with the list of comments of all SCM sheets on which the corresponding net is used.
The
Packager automatically assigns the
$orgname (original/internal SCM symbol/part name(s) and/or SCM (sub-)net name(s)),
$pagename (schematic sheet name(s)) of layout part') and
$blkrname (schematic block symbol reference name(s)) attributes for schematic sub-block tracking information to layout parts.
$rlname (Requested Logical Library Name) symbol attribute value assignments cause the
Packager to transfer symbols using non-default logical library definitions. This allows for the selection of part definitions with, e.g., manufacturer-specific library attribute settings or non-default package assignments. The non-default
loglib entry assigned through
$rlname must refer to the same part class like the default
loglib definition (for
loglib part class definitions see also
chapter 7.11).
mainpart/subpart symbol sets must be assigned to corresponding parts. I.e., heterogeneous symbol definitions such as
amain/asub and
bmain/bsub can be assigned to
amain/asub or
bmain/bsub, but not to
amain/bsub or
bmain/asub.
$rlext (Requested Logical Library Name Extension) symbol attribute value assignments work similar to
$rlname assignments.
$rlext assignments cause the
Packager to transfer symbols using non-default logical library definitions with specific name extensions (separated from the base name by an underscore _). This allows for the selection of part definitions with, e.g., standardized manufacturer-specific library attribute settings or non-default standardized package assignments.
The predefined attributes
$val (value),
$pow (power),
$type,
$comment,
$commentge and
$manufacturer are optionally used throughout the delivered BAE libraries. The user is free to apply these attribute definitions and/or to assign corresponding attribute values on demand.
The
$partside part system attribute can be used to block (attribute value
top) or force (attribute value
bottom) part mirroring. These settings have priority over any other mirror modes during interactive and automatic part placement operations. Parts violating these placement preferences are marked by the DRC, and the
/ functions list such parts in a part side error list. The
ROUTE library provides the
tag_sym_partside tag symbol for assigning
$partside attribute values.
The
$plttime (current time),
$pltdatede (current date, German Notation) and
$pltdateus (current date, US notation) system attributes are substituted with the current time and/or the current date when displayed and/or plotted on SCM sheet or layout level.
The
$pltstime (layout save time),
$pltsdatede (layout save date, German Notation) and
$pltsdateus (layout save date, US notation) system attributes are substituted with the time and/or the date the currently loaded layout was last saved. Automatic time and date substitutions are applied throughout all database hierarchy levels (marker, symbol, label, sheet and/or pad, padstack, part, layout), unless other attribute values are explicitly set for these attributes.
The
$pltpname (layout element name),
$pltpdatede (date, German Notation),
$pltpdateus (date, US notation) and
$pltptime (time) system attributes are substituted with the layout element name and/or the date and/or the time of the last
Packager run when displayed and/or plotted on SCM sheet or layout level.
The
$pltdate2de,
$pltdate2us,
$pltsdate2de,
$pltsdate2us,
$pltpdate2de and
$pltpdate2us attributes are two-digit year display versions of the
$pltdatede,
$pltdateus,
$pltsdatede,
$pltsdateus,
$pltpdatede and
$pltpdateus attributes.
The
$pltcname,
$pltcdatede,
$pltcdate2de,
$pltcdateus,
$pltcdate2us and
$pltctime attributes are substituted with the layout element name and the date and time of the last name update. These attributes are not only updated by the
Packager but also by the
.
The
$pltfbname (File Base Name) and
$pltfbsname (File Base Short Name) system attributes can be used for displaying the current element's project file name.
$pltfbname displays the project file name without the
.ddb extension.
$pltfbsname displays the project file name without the
.ddb extension and without the directory path.
The
$pltecomment system attribute can be used to assign and display DDB element comments. Element comments can be assigned through the
/ submenu or, for the currently loaded element, through the
/ dialog. The element selection dialogs are displaying element comments together with the element names. The SCM PDF output functions are displaying
SCM sheet comments rather than SCM sheet element names when creating tables of contents for SCM plans.
The
Packager supports net name assignments through the
$netname net attribute. Such net names have priority over net name assignments through label connections. I.e., the
$netname attribute can be used to control net name assignments for nets with different labels which would otherwise be named after the label which comes first in the alphabet.
$nettype pin attributes are automatically transferred to connected nets. The
$nettype value
mixed is assigned to nets with different
$nettype attribute values. The
BAE HighEnd
Packager automatically transfers
$drcblk pin attributes to connected nets. The
$drcblk attribute value addresses a
BAE HighEnd design rule check parameter block to be assigned to the corresponding net.
The
$powpin pin attribute setting causes the system to
set a symbol pin's connection width to the power pin connection width defined through the
net command and power width net attribute. The
tag_pin_powerpin tag symbol from the
ROUTE symbol library can be used for
$powpin pin attribute assignments. Alternatively, the system supports fixed
$powpin assignments through the logical definition of the symbol:
newattr "$powpin" = "1" : (pinname);
The
$viastk net attribute can be used to assign non-default via types to nets. Net-specific via padstack assignments are considered by the
Autorouter.
$notest net attribute assignments can be used to deactivate automatic test point generation by the
Packager for specific nets.
$routdis net attribute assignments can be used to exclude specific nets from the autorouting process. The
$layers net attribute can be used to assign net-specific routing layers (comma-separated signal layer numbers) for the autorouting process in
BAE HighEnd.
The
$@ attribute is padstack-specific. Text on padstack level is on layout level subsituted with the name of the part on which the padstack is placed. This feature can be useful if part names need to be displayed for pins which are placed outside the part body (e.g. during
operations).
BAE supports not only the attributes listed in
table 2-1, but also arbitrary user-defined attributes such as
$tolerance,
$identno,
$partnumber,
$price,
$supplier,
$delay,
$insertion_height, etc.
The
function from the
and/or
menu can be used for moving and/or placing selectable symbol attributes. Attribute text offsets defined through
override the global text offset set with
. The attribute to be moved is selected through a mouse-click on the attribute text. Since symbol names are internally stored as attributes, the
function can also be used to move symbol names without changing the placement of other symbol attributes.
Attribute value setting is performed either in the
Schematic Editor (using the
function from the
menu) or by fixed attribute value assignment in the logical library.
A dialog box for simultaneously displaying up to 12 symbol attributes is provided with the
function under Windows and Motif. For symbols with more than 12 attribute definitions,
and
buttons are provided for forward and/or backward scrolling. The dialog box contains a line for each attribute. This line consists of a
button, an attribute value input/edit field and the attribute name/label display. The
button can be used to clear the attribute value setting which is indicated through a
!not_set! attribute value display. Clearing the attribute value is different from specifying an empty string. Empty string attribute values are assigned and transferred as such to the net list, whilst clearing an attribute value prevents the system from assigning and/or transferring any attribute value to the net list.
Attributes are part of the net list and are annotated by the
Packager, thus providing access from the layout (e.g., by appropriate text definitions on selectable documentary layers). The
userlist utility program and
Bartels User Language can be utilized for performing automatic attribute value assignments and/or for evaluating attributes for cost analysis, production planning, manufacturing control, purchasing and ordering management, producing output data for third party systems, etc.
Part Name Pattern
BAE supports patterns for symbol names to follow if a name is not specified when the symbol is placed on the SCM sheet. Use the following commands to define a part name pattern for the currently loaded CD4081 symbol:
| Symbols | |
| Part Name Pattern | |
| Part Name Pattern () ? | IC?? |
With the commands above a part name pattern consisting of the string
IC and two digits for the numbering is defined. The default pattern for symbols without a part name pattern definition is
N????, i.e., the default pattern consists of
N and four digits for the numbering. The start number for automatic part numbering emerges from 10 with pattern
??, 100 with pattern
???, 1000 with pattern
????, etc. This helps to avoid conflicts when renaming layout parts afterwards. Parts are renamed on the layout e.g., for improving the legibility of the insertion plan (for manual insertion). This is usually more important than designating SCM parts according to some devised rules since adequate SCM documentation is achieved by displaying the part and/or circuit function with appropriate symbol definitions. We recommend to apply the automatic part naming features at the placement of SCM symbols and to perform renaming on the layout only. Functions for changing net list part names and/or for automatic part numbering are provided with both the
Layout Editor and the
Autoplacement.
Modifying the Element Boundaries
Use the following commands to set the upper right corner of the element boundaries to coordinate [14,14]:
| Settings | |
| Upper/Right Border | |
| Move to [14,14] | |
The symbol origin refers to the pick point in superior hierarchy levels. This is the point of the SCM symbol where it is picked for placement and/or movement on the SCM sheet. Usually, it makes sense to set the origin at a certain pin coordinate (e.g., left top or left bottom). Use the following commands to define the origin on pin
A (coordinate [2,10]) of the currently loaded
CD4081 symbol:
Defining the Origin
| Settings | |
| Set Origin | |
| Move to Pin "A", [2,10] | |
Saving the Symbol
The definition of symbol
CD4081 is completed now. Do not forget to save this symbol with the following commands:
| File | |
| Save Element | |
2.2.3 Creating SCM Labels
Label symbols are used on SCM sheet level to define signals and/or net names. Labels can be utilized to connect signals from different schematic sheets of the same job file. The
function from the
menu is used for placing labels onto the currently loaded SCM sheet. If a label symbol is available with the same name as specified for the signal name, then the corresponding label symbol is loaded (thus displaying special graphic e.g., for the ground signal). If no label symbol with the specified net name is available, then the label symbol named
standard is used on default. The
standard label symbol should always contain a reference text
($) for displaying the net name. BAE uses two more predefined label symbols named
bustap and
port, respectively. The
bustap label symbol is used for tapping bus connections (use the
function from the
menu). The
port label symbol is used for defining module ports in hierarchical circuit designs (use the
function from the
menu). In this section we will create two label symbols named
vss and
vdd in DDB file
demo.ddb. These symbols are intended especially for CMOS ground and power supply.
Creating a new Label Symbol
Use the following commands to produce a new label symbol (i.e. a new element of type label) named
vss in the DDB file
demo.ddb (if an element of
demo.ddb is currently loaded, then the file name can be specified either by selecting the
button from the popup menu or by specifying an empty string, i.e., pressing the return key
to the file name query):
| File | |
| New | |
| Label | |
| File Name ? | demo |
| Element Name ? | vss |
| Sheet (S)tandard/(M)anual ? | m |
| Element Width (mm/") ? | 6 |
| Element Height (mm/") ? | 10 |
Placing the Pin Symbol
Use the following commands to place the marker symbol
p at coordinate [3,7]:
| Symbols | |
| Add Symbol | |
| Library Element Name ? | p |
| Move to [3,7] | |
Graphic
Use the following commands to draw a graphic line (starting at the marker and ending at coordinate [3,4]) and a rectangle-shaped graphic area:
| Graphic | |
| Add Graphic Line | |
| Move to Marker, [3,7] | |
| Move to [3,4] | |
| Done | |
| Add Graphic Area | |
| Move to [1,3] | |
| Move to [1,4] | |
| Move to [5,4] | |
| Move to [5,3] | |
| Done | |
Text
Use the following command to place the label name text string
Vss (text size 2mm) at coordinate [1,1]:
| Text | |
| Add Text | |
| Text ? | Vss |
| Text Size | |
| Text Size ( 1.00mm) ? | 2 |
| Move to [1,1] | |
Defining the Origin
Use the following commands to set the label origin to the current marker position (i.e., at coordinate [3,7]):
| Settings | |
| Set Origin | |
| Move to Marker, [3,7] | |
Saving the Label Symbol
The definition of the label symbol
vss is completed now. Do not forget to save this symbol with the following commands:
| File | |
| Save Element | |
Creating a new Label Symbol from an existing
In this section we will create the label symbol
vdd from the previously defined label symbol
vss. Use the following commands to copy the currently loaded label symbol
vss to
vdd and load the copied label symbol
vdd:
| File | |
| Save Element As | |
| File Name ? | |
| Element Name ? | vdd |
| Load Element | |
| Label | |
| File Name ? | |
| Element Name ? | vdd |
The display now shows the
vdd label symbol, which still looks like the
vss label symbol. We will now make some modifications to create the desired
vdd symbol design.
Use the following commands to delete the text
Vss and the rectangle-shaped graphic area:
| Text | |
| Delete Text | |
| Move to [-2,-6] | |
| Graphic | |
| Delete Graphic | |
| Move to [-2,-4] | |
Use the following commands to move down the vertical graphic line:
| Graphic | |
| Move Graphic | |
| Move to [0,-3] | |
| Move to [0,-5] | |
Use the following commands to move down the marker symbol:
| Symbols | |
| Move Symbol/Label | |
| Move to [0,0] | |
| Move to [0,-5] | |
Use the following commands to create a V-shaped graphic area, i.e., an arrow-head pointing to top (the angle lock display option must be switched off to create this irregularly shaped triangle):
| Graphic | |
| Add Graphic Area | |
| Move to [-1,-2] | |
| Move to [1,-2] | |
| Grids/Rotation | |
| Rotation Off | |
| Move to [0,0] | |
| Done | |
Use the following command to place the label name text string
Vdd at coordinate [1,1] (text size 2mm is still activated):
| Text | |
| Add Text | |
| Text ? | Vdd |
| Move to [-2,0] | |
Use the following commands to set the origin to the current marker position (i.e., at coordinate [0,-5]):
| Settings | |
| Set Origin | |
| Move to Marker, [0,-5] | |
The definition of the
vdd label symbol is now completed. Do not forget to save this symbol with the following commands:
| File | |
| Save Element | |
SCM Library Symbol Design
© 1985-2026 Oliver Bartels F+E • Updated: 11 October 2010, 10:32 [UTC]
|
