|
This section describes how to create SCM plans using the
BAE Schematic Editor. Two example SCM sheets named
sheet1 and
sheet2 will be edited in the
demo.ddb DDB file.
sheet1 will contain the circuit logic. On
sheet2, the plug pin assignment and some net attributes for the
Autorouter will be defined.
The following paragraphs will introduce the basic functions for creating SCM plans, placing symbols, assigning attribute values, creating connections, placing labels, defining busses, placing texts and drawing graphic. This section also shows how to use special features such as virtual symbol definitions, group functions, defining plug pin assignments, setting net attribute values, using templates, etc.
Use the following commands to move to the BAE examples directory (i.e., where the example job file
demo.ddb resides, e.g.,
c:\baejobs), and start the
Bartels AutoEngineer:
>  C:
>  cd c:\baejobs
>  bae
> cd c:\baejobs
> bae
Use the following command to start the Schematic Editor:
| Schematic |  |
The
Schematic Editor is activated and you can start to edit SCM plans.
2.3.1 Creating and Editing SCM Plans
Creating a new SCM Sheet
Use the following commands to create a new schematic sheet named
sheet1 with paper size A4 in the DDB file
demo.ddb:
| File | |
| New | |
| Sheet | |
| File Name ? | demo |
| Element Name ? | sheet1 |
| A4 Landscape | |
A frame designating the element boundaries of the SCM sheet will appear on the screen. If the system issues an error message such as
Element does already exist!, then an SCM sheet with the specified element name has already been generated. In this case the requested element cannot be created, but must be loaded (see below). The element name query is indispensable due to the fact that a schematic circuit drawing can consist of multiple sheets. You can specify arbitrary sheet names such as
sheet1,
sheet2,
plan_1,
1,
2,
io,
memory,
plug_pinning, etc. An options menu for selecting the sheet size is activated after specifying the file and element names. This allows for the selection of predefined A0, A1, A2, A3, A4, Letter (8.5*11 Inches) and Tabloid (11*17 Inches) formats in either portrait or landscape orientation. The
option can be used to specify any other sheet size through subsequently activated element width and height prompts.
Use the following commands to store the new SCM sheet and return to the BAE main shell:
| File | |
| Save Element | |
| File | |
| Main Menu | |
Editing an existing SCM Sheet
Start the
Schematic Editor and use the following commands to reload the previously created SCM sheet element (you can select the file and element name via popup menu and mouse-pick since you are now accessing an existing element):
| File | |
| Load | |
| Sheet | |
| File Name ? | demo |
| Element Name ? | sheet1 |
The system now loads the previously created SCM sheet. An error message such as
File not found! is issued if the requested DDB file is not available. An error message such as
Element not found! is issued if the requested element is not available in the selected DDB file.
When entering the
Schematic Editor, the system knows the name of the file previously processed in any other BAE module. On subsequent file name queries this global project name can alternatively be specified by selecting the
button from the file name popup menu or by entering an empty string (i.e., by pressing the return key
) to the file name prompt.
2.3.2 Symbols
On SCM sheet level, the appropriate functions from the
menu are used for placing, moving and deleting symbols, labels and module ports, for assigning attribute values and for querying symbol logic definitions. The symbol placement routines support access to different, selectable SCM symbol libraries. The functions provided with the Symbols menu are essentially applied for generating the part list and for defining signal names.
Input Grid
BAE supports arbitrary grids and also grid-free input. Nevertheless, it is recommended to use a reasonable grid for placing the symbols to enable easy pin connections. Use the following commands to set a 2mm input grid with grid lock (this is intended for subsequently creating pin connections in a 1mm grid):
| View | |
| Grids/Rotation | |
| Set Input Grid | |
| 2.0 mm | |
| Grid+Rotation On | |
Library Access
The
function from the
menu is used for selecting the SCM library, from which the symbols should be loaded. Use the following commands to check on how the library path is currently set:
| Settings | |
| Select Library | |
| Library Name ('c:/baelib/stdsym.ddb') ? | |
The name of the currently selected library is indicated with the library name prompt. When calling the
Schematic Editor, a default library path is automatically set according to the system setup (see also
chapter 7.2 of this manual for a description of the
bsetup utility program).
An empty string input to the library name query does not change the current library path setting. A dash string input
(-) resets the library path setting (no library selected).
! and/or
. input restores the default library path defined with the setup. Under Windows, the library file name is specified through file dialog box. Use the following commands to check the library path settings:
| Settings | |
| Select Library | |
| Library Name ('c:/baelib/stdsym.ddb') ? | - |
| Select Library | |
| Library Name ('') ? | ! |
The Bartels AutoEngineer supports a most flexible database concept. This concept allows any DDB file to be used as symbol library. When loading a symbol the system will first check the job-specific library (i.e., the currently edited DDB file) for the requested library element. If the element is not contained in the project file, then the search is expanded onto the currently selected library. When loading a symbol from an external library file the
Schematic Editor will automatically create a complete copy of the requested library symbol in the current project file, and subsequent requests for the same symbol will from then on refer to the job-specific library.
Figure 2-3 illustrates the
Schematic Editor library access concept.

Figure 2-3: SCM Library Access
Changing the library path setting is meaningful only if a series of different symbols are to be loaded from a library file which is not accessible through the predefined library path. Use the following commands to set the library path to the
demolib.ddb DDB file of the current directory:
| Settings | |
| Select Library | |
| Library Name ('c:/baelib/stdsym.ddb') ? | demolib |
With the commands above the library path is set to the
demolib.ddb DDB file of the working directory, i.e., requested symbols on subsequent load operations are copied from
demolib.ddb.
Placing Symbols
Use the following commands to load the transistor symbol
tr_bc517 with part name
V1, and place it at coordinate [240,130]:
| Symbols | |
| Add Symbol | |
| Part Name ? | v1 |
| Library Element Name ? | tr_bc517 |
| Move to [240,130] | |
The part name query is used for specifying the symbol reference (e.g.,
IC10,
R8,
U004, ...). If the user types in an empty string (by pressing the return key
), then the system will automatically generate a part name according to the part name pattern defined with the corresponding symbol (see also
chapter 2.2.2, Creating SCM Symbols). An empty string input to the part name query can also be activated by pressing a mouse button. The system will issue an error message when the part name space defined with the part name pattern is exhausted, i.e., if no new part name corresponding to the name pattern can be generated automatically any more.
The part names used throughout a schematic design must be unique to avoid conflicts in subsequent
Packager and
processes. Part name uniqueness is implicitly ensured when using the automatic part naming facilities. With explicit part naming the system performs special part name uniqueness checks to avoid name conflicts. If the specified part name is already used on the currently loaded SCM sheet, then the user must confirm to use this part name. If the part name is used on the currently loaded sheet, then the corresponding part is deleted and/or replaced with the new part (with a different SCM symbol on request and without any attribute value settings). However, if the specified part name is used on a different sheet, then the corresponding part will not be deleted automatically, i.e., it is up to the user to delete this part later to avoid name conflicts on subsequent
Packager processes.
The library element name query is used for selecting the library symbol (e.g.,
74as00,
c,
led,
pal_20r4,
i80286, etc.). A mouse-click or a question-mark input string
(?) to the library element name query activates a popup menu with a list of all library files available with the predefined default library path. The
button or
> input to the library file name prompt selects the standard SCM library defined through the
function from the
menu. The
button from this menu provides optional access to the job-specific library in the currently processed DDB file. After selecting the library file, another popup menu with a list of all symbols available in the selected library file is activated.
Use the following commands to place one capacitor symbol
c and one resistor symbol
r, both with automatically generated part name:
| Symbols | |
| Add Symbol | |
| Part Name ? | |
| Library Element Name ? | c |
| Move to [140,190] | |
| Add Symbol | |
| Part Name ? | |
| Library Element Name ? | r |
| Move to [60,130] | |
The
function is used to place an automatically named part which refers the same symbol as with the preceding symbol load operation. Use the following commands to place three more resistor symbols on the circuit diagram:
| Symbols | |
| Next Symbol/Label | |
| Move to [100,130] | |
| Next Symbol/Label | |
| Move to [140,130] | |
| Next Symbol/Label | |
| Move to [180,130] | |
| Next Symbol/Label | |
| Move to [210,130] | |
Pressing the right mouse button during symbol placement will activate a submenu which provides functions such as specifying absolute placement coordinates, symbol rotation and symbol mirroring. Use the following commands to load another resistor symbol, rotate it and place it at coordinate [170,170]:
| Symbols | |
| Next Symbol/Label | |
| Rotate Left | |
| Move to [170,170] | |
The
Schematic Editor provides a function for setting a default rotation angle for symbol placement operations. If you intend to place a series of symbols at a special rotation angle (and/or mirror mode) it is most useful to set the default rotation angle accordingly, thus avoiding the need of explicitly specifying the rotation angle for each symbol. Use the following commands to set the default symbol placement rotation angle to 90 degree:
| Symbols | |
| Set Default Angle | |
| 90 Degrees Left | |
The standard rotation angle setting above will cause symbols to be automatically rotated by 90 degree on subsequent load operations. Use the following commands to place some more symbols at 90 degree rotation angles:
| Symbols | |
| Add Symbol | |
| Part Name ? | |
| Library Element Name ? | c |
| Move to [30,80] | |
| Add Symbol | |
| Part Name ? | |
| Library Element Name ? | d |
| Move to [220,180] | |
| Add Symbol | |
| Part Name ? | |
| Library Element Name ? | s_1dil |
| Move to [50,140] | |
| Next Symbol/Label | |
| Move to [90,140] | |
| Next Symbol/Label | |
| Move to [130,140] | |
| Next Symbol/Label | |
| Move to [170,140] | |
Use the following commands to reset the standard rotation angle to 0 degree, and place some more symbols:
| Symbols | |
| Set Default Angle | |
| 0 Degrees Left | |
| Next Symbol/Label | |
| Move to [80,70] | |
| Next Symbol/Label | |
| Move to [80,50] | |
| Next Symbol/Label | |
| Move to [80,30] | |
All library symbols stored to the project file are directly available for repeated load operations. I.e., we can also place the symbol CD4081 (which was created in
chapter 2.2.2 and stored to the project file
demo.ddb) without accessing an external library file. Use the following commands to place some CD4081 symbols; note that mouse-click and popup menu features are utilized for specifying the part name and selecting the library element, i.e., no keyboard input is necessary for performing the following operations:
| Symbols | |
| Add Symbol | |
| Part Name ? |  |
| Library Element Name ? | |
| Select Button | |
| Select Element "cd4081" | |
| Move to [60,110] | |
| Next Symbol/Label | |
| Move to [100,110] | |
| Next Symbol/Label | |
| Move to [140,110] | |
| Next Symbol/Label | |
| Move to [180,110] | |
The popup menu for selecting the SCM library file provides access to all library files of the predefined library path as well as to the job-specific library selectable with the
button. The subsequently activated popup menu for selecting the library symbol simultaneously provides access to the table of contents of the selected SCM symbol library (the symbol load function can be canceled by selecting the
button).
The system also provides features for directly accessing certain library files of the predefined library path. Use the following commands to access the symbol
z80 from the library file
zilog.ddb:
| Symbols | |
| Add Symbol | |
| Part Name ? | |
| Library Element Name ? | zilog/z80 |
Now the symbol
z80 is picked with the graphic cursor and can be placed. Use the following commands to abort this operation:
| Abort | |
Aborting the symbol load function will prevent the system from copying the symbol from the library file to the currently edited project file, thus avoiding redundant database entries in the job file.
The general syntax for specifying the library element name is:
<library_file_name>/<library_element_name>
If the user hits a mouse button or types a question-mark
(?) to the library element name prompt, then the system will activate a popup menu for selecting the library file. If a question-mark is specified for the library element name, then the system will activate the popup menu for selecting symbols from the given library file (i.e.,
zilog/? activates the popup menu for selecting symbols from the
zilog.ddb library file).
Bartels AutoEngineer provides features for assigning different schematic symbol types to the same layout package type (see the descriptions of the
Packager and the
loglib utility program for more details). Use the following commands to place one coil symbol
rels and two contact symbols
relc:
| Symbols | |
| Add Symbol | |
| Part Name ? | |
| Library Element Name ? | rels |
| Move to [240,180] | |
| Add Symbol | |
| Part Name ? | |
| Library Element Name ? | relc |
| Move to [210,80] | |
| Next Symbol/Label | |
| Move to [210,60] | |
The symbols placed with the commands above are assigned to a single relay part according to their logical library definition (see also the contents of the
demolib.def logical library file). Note that the
Packager will allocate a single layout package for these symbols.
Attribute Value Assignment
On SCM sheet level, attribute values can be assigned to all parts where the corresponding symbols contain attribute definitions (i.e., lowercase text starting with a dollar sign, such as
$val,
$plname,
$pow, etc.). Use the following commands to assign values to the
$val attribute defined on
c100,
r100 and
v1000:
| Symbols | |
| Assign Value | |
| Move to "c100", [140,190] | |
| $val | |
| Attribute Value ? | 10uF |
| Return | |
| Assign Value | |
| Move to "r100", [60,130] | |
| $val | |
| Attribute Value ? | 100k |
| Return | |
| Assign Value | |
| Move to "v1000", [220,180] | |
| $val | |
| Attribute Value ? | 1N4001 |
| Return | |
Apply commands such as shown above to assign values to the
$val attribute defined with the parts
r101,
r102,
r103 (set value
100k, respectively),
r104 (value
10k),
r105 (value
1M) and
c101 (value
100pF). Note that part and symbol name (e.g.,
Log. Name: c100, Macro: c) is displayed in the status line during attribute name queries, thus indicating the symbol currently selected for attribute value assignment.
The attributes submenu provides a list of the attributes defined on the selected symbol, respectively. I.e., this submenu can vary for different symbols. The
option is only provided for symbols containing more than one attribute definition.
is used to end the attribute value assignment function.
With the
rels and
relc symbols, only one attribute named
$rpname is defined. This attribute is used to designate the requested part name, i.e. the
$rpname value will cause the
Packager to allocate a physical part with a user-defined part name for assigning the logical parts referring to that requested part name. This feature should be applied to force the
Packager to assign different symbols to the same part whenever necessary (e.g., for op-amps with power supply, relays, etc.). Use the following commands to set the
$rpname attribute of the symbol
k10 to
k1, i.e. to assign the logical part named
k10 to the physical part named
k1:
| Symbols | |
| Assign Value | |
| Move to "k10", [240,180] | |
| $rpname | |
| Attribute Value ? | k1 |
Perform the same attribute value assignment as above (value
k1 for attribute
$rpname) also for the parts
KK100 and
KK101 (relay contacts
relc). This will cause the
Packager to pack these two symbols together with the relay coil
K10 into a physical part named
K1.
The
$plname attribute is used for assigning non-default package types to logical parts. Setting the
$plname attribute value for a certain logical part will cause the
Packager to assign this logical part to the layout package type defined with the
$plname value instead of the default package definition from the logical library. Use the following commands to set
$plname attribute values in order to change the default (standard) package type assignments of the logical parts
c100,
c101,
r104 and
r105 to SMD package types:
| Symbols | |
| Assign Value | |
| Move to "c100", [140,190] | |
| $plname | |
| Attribute Value ? | chip1210 |
| Return | |
| Assign Value | |
| Move to "c101", [30,80] | |
| $plname | |
| Attribute Value ? | chip1206 |
| Return | |
| Assign Value | |
| Move to "r104", [210,130] | |
| $plname | |
| Attribute Value ? | minimelf |
| Return | |
| Assign Value | |
| Move to "r105", [170,170] | |
| $plname | |
| Attribute Value ? | chip1206 |
| Return | |
If you have executed all work steps of this paragraph correctly, then your circuit diagram should look like the one shown in
figure 2-4.
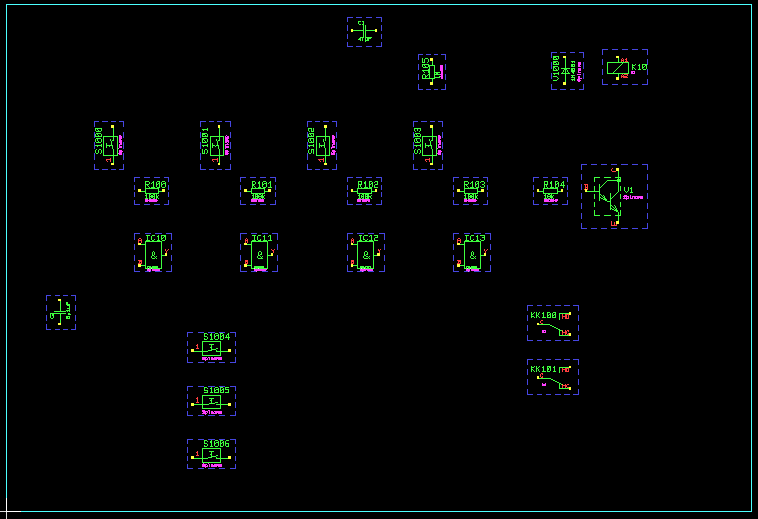
Figure 2-4: SCM Sheet with Symbols
Moving Symbols, Deleting Symbols, Changing Symbol Names
The
function is used to move symbols already placed on the sheet. The
Schematic Editor applies an built-in signal router for automatically rerouting connections to the moved symbol (see below). Pressing the right mouse button during symbol movement will activate a submenu with special options for rotating and mirroring, absolute coordinates input, activate and/or deactivate the signal router, etc. The
function is used to delete symbols. Part names and/or references can be changed with the
function. You should test these functions on the currently loaded sheet and use the
and
functions for estimating design modifications and returning to the original design stage. Please note that the symbol pick function picks the symbol which is placed inside other symbols at the pick position to prevent from unintentionally selecting frame symbols.
2.3.3 Connections, Labels, Busses
The Connections menu provides functions for creating, modifying, and deleting connections and/or busses on SCM sheet level.
Selecting the Connection Point Marker
Use the following commands to select the marker symbol
tconnector to be the connection point marker for indicating T-shaped connections:
| Settings | |
| Set Junction Point | |
| Please confirm (Y/N) : | y |
| Junction Point Name (junction) ? | tconnector |
The connection point marker is a special marker symbol. The connection point marker symbol should contain a normal graphic area instead of a contact area as with the pin marker symbols. The connection point marker symbol
junction is assigned on default (note that the system expects this marker symbol to be available in the SCM standard symbol library; see also the description of the
SCMDEFLIBRARY command supported by the
bsetup utility program).
Graphic Control Function, Input Grid
Contact areas on pin symbols are utilized for displaying net list changes on SCM sheet level. As soon as a pin is connected correctly, the contact area defined on the corresponding pin marker will disappear, thus providing most useful graphical indication of net list changes. This feature is required, since BAE allows connections ending at any point (as to be utilized for bus definitions; see below). Note that single-segment pin connections will also cause the pin contact area to fade out, thus providing a convenient way of marking pins which should not be connected as already being processed. Contact areas attached to open connections consisting of more than one segment, however, are displayed with error highlight, and the
function from the
menu counts such an open connection as drawing error.
If you have problems connecting certain pins at the current input grid settings, then you should use the Display functions for selecting a smaller input grid (or even release the grid lock).
Use the following commands to select 1mm input grids for subsequent pin connection interactions:
| View | |
| Grids/Rotation | |
| Set Input Grid | |
| 1.0 mm | |
| Grid+Rotation On | |
View, Display
The middle mouse button can be used to activate the
menu at any time during symbol placement and/or the drawing of geometry and connections. Particularly the zoom functions are very helpful at the generation of connections. The following example shows how to zoom to a certain window:
| Zoom Window | |
| Move to Window Start Point | |
| Move to Window End Point | |
The following commands can be used to restore the full view display:
| Zoom All | |
Creating Connections
The first connection to be created should connect part
S1000 with part
IC10. Use the following commands to zoom to the workspace around these two symbols:
| Zoom Window | |
| Move to Window Start Point, [40,80] | |
| Move to Window End Point, [110,170] | |
Use the following commands to connect pin
1 of part
S1000 with pin
A of part
IC10:
| Connections | |
| Add Connection | |
| Move to Pin "S1000.1", [50,140] | |
| Move to Connection Corner Point, [50,110] | |
| Move to Pin "IC10.A", [60,110] | |
function and try again (if necessary use a finer input grid). If the connection is completed correctly, then use the following commands to connect pin
1 of the resistor
R100 to this connection:
Each connection corner point is set by pressing the left mouse button, and a connection is completed by pressing the right mouse button. After correct completion of the above-mentioned work step the pin markers should have become invisible. If this is not true, then step back using the
| Connections | |
| Add Connection | |
| Move to Pin "R100.1",[60,130] | |
| Move to Connection,[50,130] | |
A T-shaped connection has been created. Note how the system places a junction point marker to indicate the connection cross point.
Now you should create further connections to get a circuit drawing as shown in
figure 2-5. You can also experiment with the functions for moving, cutting and deleting segments and for deleting connection and/or nets. Apply the
and
functions for estimating design modifications and returning to the original design stage. Please consider the
function for automatically connecting two selectable points on the currently loaded SCM sheet if at all possible with up to three connection segments.
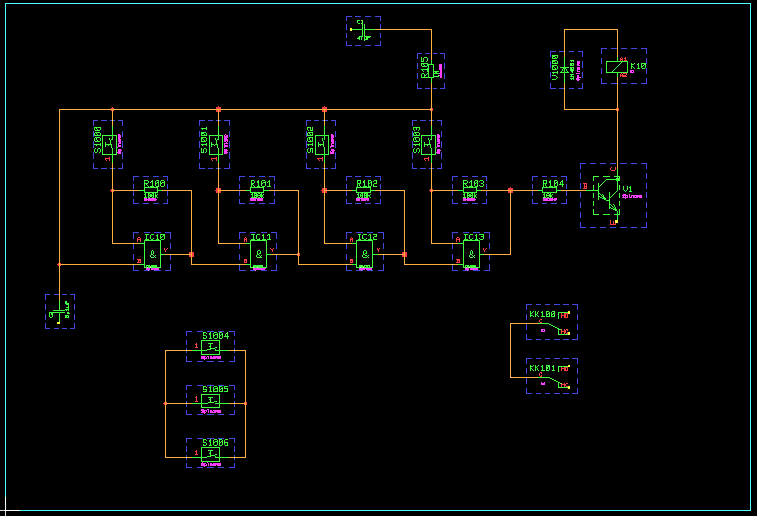
Figure 2-5: SCM Sheet with Symbols, Connections
Labels
Labels are special symbols to be utilized for defining net names. Labels can be applied for assigning certain signal names to connections. Label-defined signal names are known throughout all sheets of the schematics, i.e., labels can also be applied for connecting nets on different sheets.
In
chapter 2.2.3 we created the two label symbols
vss (0V CMOS supply) and
vdd (positive CMOS supply) in our job file
demo.ddb. I.e., these two symbols are available in the currently edited project file and can be loaded to the sheet using the
function from the
menu.
Use the following commands to define the signal
Vss by placing the label symbol
vss on the circuit drawing:
| View | |
| Zoom All | |
| Zoom Window | |
| Move to Window Start Point, [120,160] | |
| Move to Window End Point, [180,200] | |
| Symbols | |
| Add Label | |
| Net Name ? | vss |
| Move to [130,190] | |
Use the following commands to connect pin
1 of capacitor
C100 with signal
Vss by creating a connection between the capacitor pin and the previously placed label:
| Connections | |
| Add Connection | |
| Move to Label Pin,[130,190] | |
| Move to Pin "C100.1",[140,190] | |
Take care that the contact area of the label pin will extinguish in order to ensure a correct connection between the capacitor and signal
Vss.
It is not necessary to explicitly connect a label if the label is placed to a connection corner point. Use the following commands to load the label symbol
Vdd, and connect this label to the connection between capacitor
C100 and resistor
R105:
| Symbols | |
| Add Label | |
| Net Name ? | vdd |
| Move to Connection Corner Point, [170,190] | |
Again take care that the contact area of the label pin will extinguish.
If no special label symbol for the requested net name is defined and/or available, then the system uses the default label symbol named
standard (presuming that at least this label symbol is available in the project file or in the selected library). Use the following commands to assign signal name
NET to the connection at pin
1 of switch
S1004:
| Zoom All | |
| Zoom Window | |
| Move to Window Start Point, [10,40] | |
| Move to Window End Point, [100,100] | |
| Symbols | |
| Add Label | |
| Net Name ? | net |
| Set Angle | |
| Angle (Deg./(R)ad.) ? | 180 |
| Move to Connection Corner Point, [70,70] | |
On default, the
standard label symbol is used when placing labels for net names without name-matching label symbol. This default label symbol can be changed through the
parameter setting of the
dialog from the
menu. This feature allows for the assignment of different label symbols to certain net names and/or net types without having to define a net-specific label symbol for each of these nets.
As shown in the example above the same placement functions apply for labels and symbols. I.e., you can rotate labels, set a standard placement angle, specify absolute placement coordinates, etc.
Now you should load and place further labels to get a circuit drawing as shown in
figure 2-6 (connect label
Vss to pins
V1.E,
C101.1 and
S1006.2; connect label
Vdd to pins
K10.A1 and
KK100.C; connect label
NET to pin
IC10.B). It is recommended to apply the
function for the repeated placement of the same label. You should also utilize the popup menu for selecting the label and/or signal name. This net name popup menu is activated when pressing a mouse button or typing the question-mark string
(?) to the net name query. The net name popup offers a menu with all signal names of the currently loaded SCM sheet, i.e., the net name menu does contain all those labels which are already connected to pins of the currently defined net list. The
button of the net name popup menu is used for activating the
function.
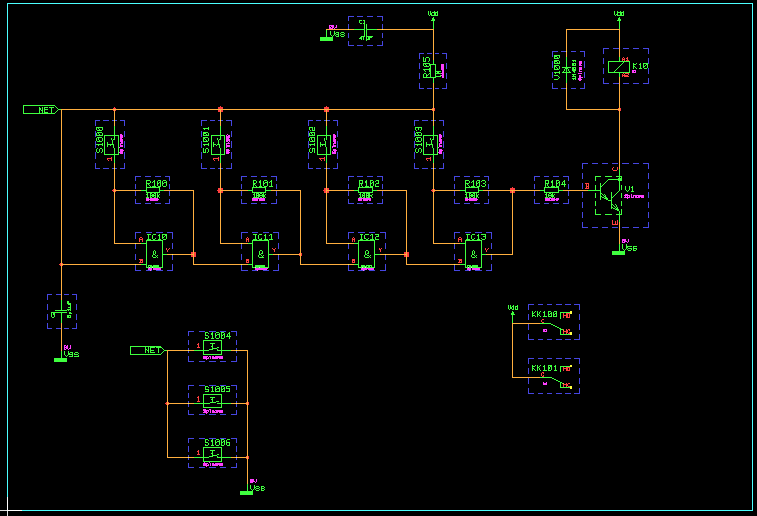
Figure 2-6: SCM Sheet with Symbols, Connections, Labels
The BAE design system instantly updates the net list with the circuit drawing. I.e., the
Schematic Editor is capable of controlling and correlating the net list data with the circuit diagram at any stage of the design process. Use the following commands to test this most important feature:
| Highlight Net | |
| Move to Connection | |
The
function from the
menu is used to mark all connections of the selected net with a special ("Highlight") color. The
function works as a toggle; to reset the highlight of a certain net simply re-select that net with the
function. In
BAE HighEnd, the
function causes a highlight and/or de-highlight of the selected nets in all currently loaded plans of the current project file on schematic sheet and layout board level (global net highlight, cross-probing).
Signal Router
The
Schematic Editor provides an built-in signal router for performing automatic connection re-routing when moving symbols and/or labels
or groups on SCM sheet level. Signal routing can be activated and/or deactivated
through the
dialog from the
menu or with the
and/or
options from the
function submenu to be activated by pressing the right mouse button whilst moving a symbol or label. The selected signal routing mode is saved with the currently loaded SCM sheet (see also
chapter 2.1.5).
Warning
Please note that the signal router should be considered "as-is", i.e., it is straight-forward designed with the intention to simplify work rather than to provide an academically optimum SCM autorouter solution with a long time-to-application/user period. We are aware of the fact that the signal router could produce unpredictable results (e.g., elimination of connections) in cases where symbol movement might cause net list conflicts. It is recommended to move symbols in a step-by-step approach rather than to move long distances and to refrain from placing symbols onto each other. You can always use the
function and retry in cases where you are not pleased with the result.
Busses
The next operation is to connect the pins on the right side of the relay contacts
KK100 and
KK101 to a bus. First of all use the following commands to zoom to a suitable workspace:
| Zoom Window | |
| Move to Window Start Point, [190,40] | |
| Move to Window End Point, [290,100] | |
Use the following commands to define a bus:
| Connections | |
| Add Connection | |
| Move to Connection Start Point,[240,90] | |
| Move to Connection Corner Point,[240,50] | |
| Move to Connection End Point,[250,50] | |
| Define Bus | |
| Move to Connection | |
The definition of a bus is accomplished by defining a connection without pin contacts and then selecting that connection with the
function. The system uses beam-shaped outlines for displaying bus connections.
Use the following commands to define the bus tap
OUT0 and connect that bus tap with pin
N0 of part
KK100:
| Connections | |
| Tap Bus | |
| Net Name (Range) ? | out0 |
| Move to Bus,[240,80] | |
| Mirror | |
| Move to Level of Pin "KK100.N0" | |
| Add Connection | |
| Move to Bus Tap "OUT0" | |
| Move to Pin "KK100.N0" | |
After specifying the bus pin net name the system will load the
bustap label symbol, which then can be placed on the bus; the submenu available during bus tap placement provides the
option which can be used for mirroring the bus tap to the opposite side of the bus. The
bustap symbol is a special label symbol, which is always used for displaying bus pins thus defining sub-signals on the corresponding bus (ensure that the
bustap label symbol is available in the preset library)
The bus tap net name query also accepts net name range specifications. Use the following commands to place three more bus taps named
OUT1,
OUT2 and
OUT3 (the previously selected bus tap mirror mode is still activated):
| Connections | |
| Tap Bus | |
| Net Name (Range) ? | out(1-3) |
| Move to Bus,[240,80] | |
| Move to Level of Pin "KK100.NC" | |
| Move to Level of Pin "KK101.N0" | |
| Move to Level of Pin "KK101.NC" | |
You should now connect the bus taps
OUT1 (to pin KK100.NC),
OUT2 (to pin KK101.N0) and
OUT3 (to pin KK101.NC).
Please note also the special
menu functions for manipulating busses and/or bus taps
(,
,
).
The
Schematic Editor provides features for assigning bus signal names to support bus connections between different sheets of the schematics. Use the following commands to load a label named
BUS, and connect that label to the previously defined bus (take care that the contact area of the label extinguishes to ensure a correct connection):
| Symbols | |
| Add Label | |
| Net Name ? | bus |
| Move to Bus,[250,50] | |
Figure 2-7 illustrates the
Bartels AutoEngineer features for bus definitions. The two bus signals
S1 in
figure 2-7a are not connected since they are tapped to different busses. In
figure 2-7b the bus signals
S1 are tapped to the same bus, i.e., they are connected.
Figure 2-7c illustrates how to define sub-busses
(DATA and
ADDR); the bus signals
S1 are not connected since they are tapped to different sub-busses.
Figures 2-7d and 2-7e show how to use labels for the assignment of bus signal names. The signals
S1 in
figure 2-7d are tapped to busses with the same label
(BUS) and thus are connected, whilst in
figure 2-7e the signals
S1 are tapped to busses with different labels
(BUS1 and
BUS2) and thus are not connected.
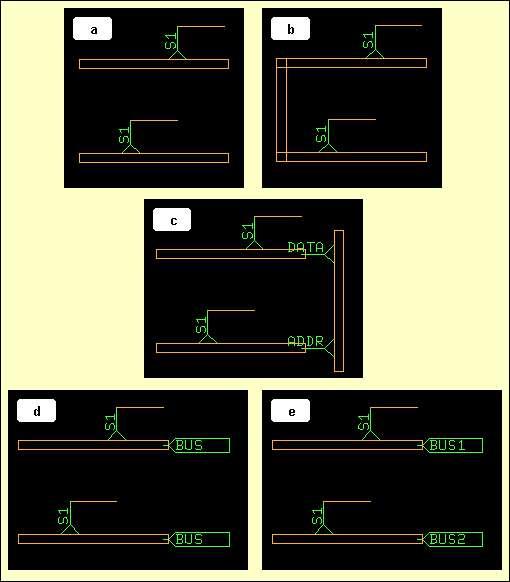
Figure 2-7: SCM Bus Connections
2.3.4 Text and Graphic
Text and graphic can be defined on SCM sheet level. Use the following commands to draw a graphic frame with a legend box around your circuit drawing:
| Graphic | |
| Add Graphic Line | |
| Move to [10,10] | |
| Move to [290,10] | |
| Move to [290,200] | |
| Move to [10,200] | |
| Move to [10,10] | |
| Done | |
| Add Graphic Line | |
| Move to [290,40] | |
| Move to [220,40] | |
| Move to [220,10] | |
| Done | |
| Add Dot Line | |
| Move to [290,20] | |
| Move to [220,20] | |
| Done | |
Use the following commands to enter the text strings
DEMO (with text size 10mm) and
sheet1 (with text size 4mm) to the previously defined legend box:
| Text | |
| Add Text | |
| Text ? | DEMO |
| Text Size | |
| Text Size ( 4.00mm) ? | 10 |
| Move to [230,25] | |
| Add Text | |
| Text ? | sheet1 |
| Text Size | |
| Text Size (10.00mm) ? | 4 |
| Move to [230,13] | |
Designing SCM Circuits
© 1985-2026 Oliver Bartels F+E • Updated: 11 October 2010, 10:32 [UTC]
|
